
This topic contains the following sections:
Configure RSS Publications for Incident Alerts
RSS (Really Simple Syndication) allows you to publish incident messages in a standardized XML-based feed. This makes it easy to share incident alerts across various systems and technologies, allowing you to send alerts or updates to desktop notifications or public-facing pages.
To configure RSS publications for incident alerts:
-
In the header menu, click Incidents.
-
In the left navigation pane, under Settings, click Publication.
-
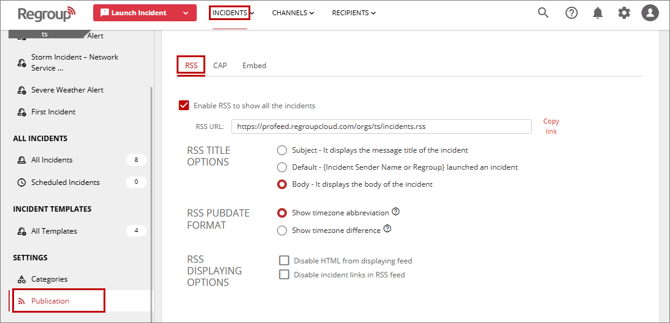
Under RSS tab, enable the Enable RSS to show all the incidents option to activate RSS publication.
-
Opionally, click Copy Link to use the feed URL for:
-
Desktop notifications
-
Public web pages
-
Other RSS-compatible platforms
-
-
In the RSS Title Options section, choose one of the following:
-
Subject: Displays the message title of the incident as the RSS feed title.
-
Default: Displays the RSS feed title in the following format:
[Incident Sender Name or Regroup] launched an incident
-
Body: Displays the body content of the incident message as the RSS feed title.
-
-
Select one of the following options to define how the incident publication date and time are displayed in the RSS feed.
-
Show timezone abbreviation: Displays the timezone using abbreviations. For example, Wed, 23 May 2018 12:00:00.
-
Show timezone difference: Displays the timezone using UTC offset values. For example, Wed, 23 May 2018 12:00:00 -06:00
-
-
In the RSS Displaying Options section, choose:
-
Disable HTML from displaying feed: If checked, HTML formatting is removed from the RSS feed.
-
Disable incident links in RSS feed: If checked, removes incident link tags from the RSS feed.
-
-
Click Save.
After you enable the RSS to show all the incidents option, the RSS delivery method becomes available when launching an incident or configuring an incident template. You can then select the RSS delivery method and specify the required RSS parameters while configuring the message. See the Send Desktop Notifications Using RSS topic for additional information.
Configure CAP Publications for Incident Messages
The Common Alerting Protocol (CAP) is an XML-based data format standard for exchanging alert data among many different technologies and systems. CAP allows a warning message to be sent simultaneously over many CAP-compliant warning systems to different endpoints (such as radio, television, cell phones, Internet, internal display and desktop alerts).
You can generate a CAP feed URL for incident messages.
-
In the header menu, click Incidents.
-
In the left navigation pane, under Settings, click Publication.
-
Under Publications, click the CAP tab.
-
Under CAP tab, select the Enable CAP Feed option.
-
Copy the CAP feed URL and use it in external CAP-compliant systems to access and retrieve incident alert information.
After you enable the CAP Feed option, the CAP delivery method becomes available when launching an incident or configuring an incident template. You can then select the CAP delivery method and specify the required CAP parameters while configuring the message. See the CAP 1.2 Messaging Configuration topic for additional information.
Configure Embed Page For Incident Messages
The Embed feature allows you to generate an embeddable page that displays incident messages externally using an iframe URL. You can configure which incident messages are displayed by selecting severity levels, incident status, and timeframe options.
To configure the Embed page:
-
In the header menu, click Incidents.
-
In the left navigation pane, under Settings, click Publication.
-
Under Publications, click the Embed tab.
-
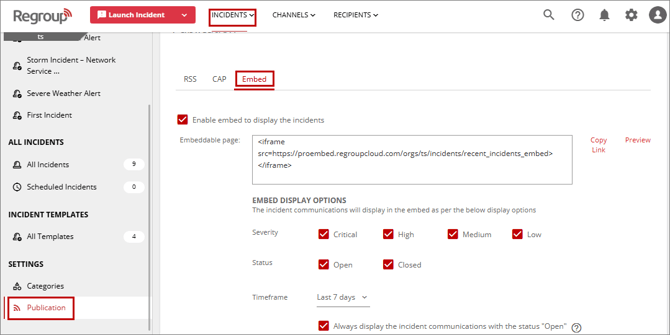
Under Embed tab, enable the Enable embed to display the incidents option to generate an embeddable page URL.
-
For the Embeddable page URL, you can perform the following actions:
-
Click Copy Link to copy the generated iframe code. You can add this iframe code to your website to display incident messages.
-
Click Preview to preview the embedded incident messages page.
-
-
Select the severity levels to display incident messages on the embedded page. Only incident messages that match the selected severity levels are displayed. For example, if you select only Critical and High, only incident messages with Critical and High severity levels are displayed on the embedded page.
-
Select the incident statuses to display incident messages on the embedded page. Only incident messages that match the selected incident statuses are displayed. For example, if you select only Open, only incident messages for active incidents are displayed on the embedded page.
-
From the Timeframe dropdown, select the time period for displaying incident messages on the embedded page. This option defines how far back incident communications are displayed. For example, Last 7 days.
-
Optionally, select Always display the incident communications with the status "Open" to display all incident messages for active incidents regardless of the selected timeframe. This option is available only when Open is selected as the incident status.
-
Click Save.