---
title: Create Group Manually
description: Overview This guide explains how to create a group manually in the system. You can set up group details, permissions, and settings to match your...
---
[Skip to content](https://resources.regroup.com/regroupkb/docs/create-group-manually#main-content)
English
Show submenu for translations

Open main navigation
Close main navigation
- English
Show submenu for translations
- [Contact us](https://bit.ly/47rQCNC)
[Contact us](https://bit.ly/47rQCNC)
How can we help you?
- There are no suggestions because the search field is empty.
1. [Regroup Knowledge Base](https://resources.regroup.com/regroupkb)
2. [Manage Groups](https://resources.regroup.com/regroupkb/manage-groups)
# Create Group Manually
### **Overview**
This guide explains how to create a group manually in the system. You can set up group details, permissions, and settings to match your organization’s needs, including nesting groups, setting privacy levels, and configuring communication options.
---
### **Steps to Create a Group**
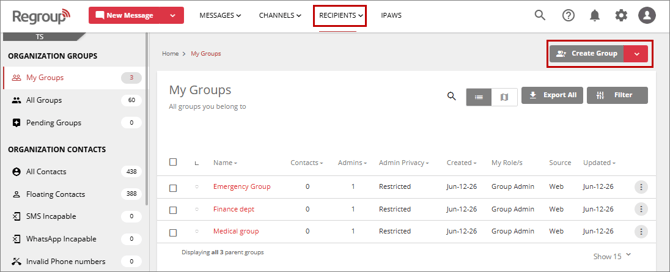
1. Go to the **Recipients** tab and open **My Groups**.
2. Click **Create Group** in the top-right corner.
3. **Enter Group Details**
4. **Group Name**: Up to 250 characters.
5. **Description**: Visible to any admin who can view the group.
6. **Allow Contacts to Leave**: Lets members remove themselves from the group via their profile.
7. **Allow Admins to Leave**: Lets assigned admins remove themselves from the group.
8. **Set Parent Group (Optional)**
- Choose a parent group from the **Parent Group** dropdown to nest this group within your organization’s hierarchy.
9. **Select Admin Privacy**
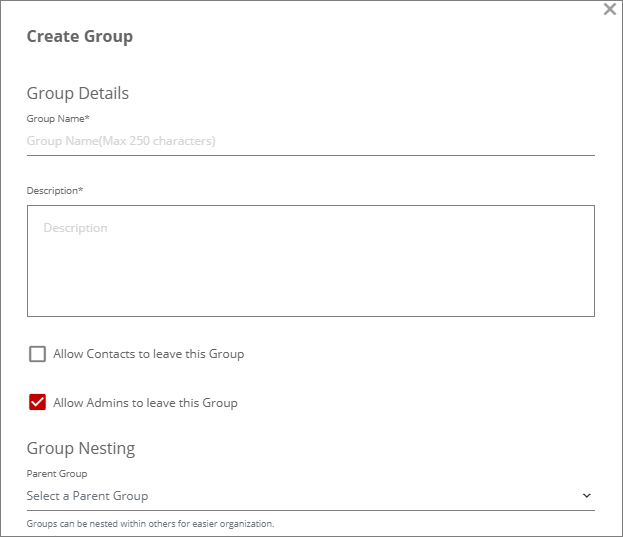
- **Public** – All admins can view and send messages.
- **Restricted** – All admins can view but must request permission to send messages.
- **Hidden** – Only authorized admins can view or send messages.
10. **Choose Group Type** *(Requires enabling under Organization Settings \> Advanced\> Feature Settings group-level “Announcements Only vs Open Discussion” )*
- **Announcements Only** – Recipients cannot reply via Email, SMS, or the mobile app.
- *Tip*: Include a note in your message that replies are not received.
- **Open Discussion** – Recipients can reply, and admins can view and manage responses.
11. **Set Opt-Out Preferences**
- **Allow Opt-Out** – Contacts can opt out of non-urgent Email, SMS, or TTS notifications. Urgent alerts always go through.
- **No Opt-Out** – Contacts cannot opt out from their profile, but can use specific SMS commands to stop SMS or TTS notifications.
12. **Add Group Location (Optional)**
- Enable **Add a Location to this Group**.
- Enter and select the address.
- Choose a **Group Address Type** to link the group to a pin on the messaging map.
13. **Channel and Auto-Delete Options**
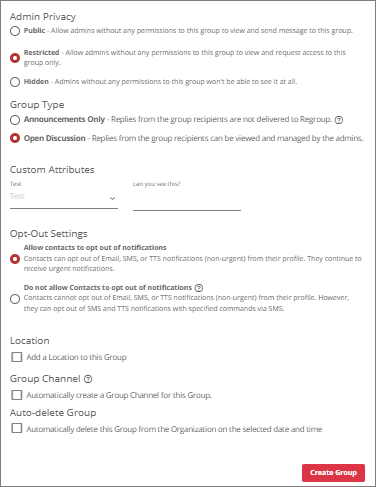
- **Group Channel**: Enabled by default to create a channel linked to the group.
- **Auto-Delete Group**: Set a date for automatic deletion.
14. **Create the Group**
- - Click **Create Group**.
- If your organization uses **Open Groups**, the group is created immediately.
If **Approval Required** is enabled, an organization admin must approve it in **Pending Groups** under the **Recipients** tab.
- [Getting started](https://resources.regroup.com/regroupkb/getting-started)
- [Incident Management](https://resources.regroup.com/regroupkb/incident-management)
- [Set Up Organization Account](https://resources.regroup.com/regroupkb/set-up-organization-account#main-content)
- [Organization Setting](https://resources.regroup.com/regroupkb/set-up-organization-account#organization-setting)
- [Configure Organization Sign-Up Pages](https://resources.regroup.com/regroupkb/set-up-organization-account#configure-organization-sign-up-pages)
- [Manage Group Automation](https://resources.regroup.com/regroupkb/set-up-organization-account#manage-group-automation)
- [Configure Message Default Settings](https://resources.regroup.com/regroupkb/set-up-organization-account#configure-message-default-settings)
- [Manage Add-Ons](https://resources.regroup.com/regroupkb/set-up-organization-account#manage-add-ons)
- [Configure Social Media Preferences](https://resources.regroup.com/regroupkb/set-up-organization-account#configure-social-media-preferences)
- [View and Download Message Reports](https://resources.regroup.com/regroupkb/set-up-organization-account#view-and-download-message-reports)
- [Configure Contacts Management](https://resources.regroup.com/regroupkb/configure-contacts-management)
- [Set Up Admins and Roles](https://resources.regroup.com/regroupkb/set-up-admins-and-roles#main-content)
- [Manage Roles](https://resources.regroup.com/regroupkb/set-up-admins-and-roles#manage-roles)
- [Managing Existing Admins](https://resources.regroup.com/regroupkb/set-up-admins-and-roles#managing-existing-admins)
- [Manage Roles](https://resources.regroup.com/regroupkb/manage-roles)
- [Manage Groups](https://resources.regroup.com/regroupkb/manage-groups#main-content)
- [Create Groups Using Import](https://resources.regroup.com/regroupkb/manage-groups#create-groups-using-import)
- [Add Groups Using FTP Import](https://resources.regroup.com/regroupkb/manage-groups#add-groups-using-ftp-import)
- [Create or Update Group Hierarchy](https://resources.regroup.com/regroupkb/manage-groups#create-or-update-group-hierarchy)
- [Manage Group Files](https://resources.regroup.com/regroupkb/manage-groups#manage-group-files)
- [Manage Group Admin Profile](https://resources.regroup.com/regroupkb/manage-groups#manage-group-admin-profile)
- [Export Groups](https://resources.regroup.com/regroupkb/manage-groups#export-groups)
- [Configure Recipients and Admins](https://resources.regroup.com/regroupkb/configure-recipients-and-admins#main-content)
- [Add Recipients to Groups](https://resources.regroup.com/regroupkb/configure-recipients-and-admins#add-recipients-to-groups)
- [Manage Group Contacts](https://resources.regroup.com/regroupkb/configure-recipients-and-admins#manage-group-contacts)
- [Manage Organization Contacts](https://resources.regroup.com/regroupkb/configure-recipients-and-admins#manage-organization-contacts)
- [Manage Floating Contacts](https://resources.regroup.com/regroupkb/configure-recipients-and-admins#manage-floating-contacts)
- [Manage Communication Channels](https://resources.regroup.com/regroupkb/manage-communication-channels#main-content)
- [Create Channels](https://resources.regroup.com/regroupkb/manage-communication-channels#create-channels)
- [Create Channels Using Import](https://resources.regroup.com/regroupkb/manage-communication-channels#create-channels-using-import)
- [Setup Channels](https://resources.regroup.com/regroupkb/manage-communication-channels#setup-channels)
- [Create and Manage Sender Profiles](https://resources.regroup.com/regroupkb/manage-communication-channels#create-and-manage-sender-profiles)
- [Setup Social Media](https://resources.regroup.com/regroupkb/manage-communication-channels#setup-social-media)
- [Add Recipients to Channel](https://resources.regroup.com/regroupkb/manage-communication-channels#add-recipients-to-channel)
- [Manage Existing Channel Admins](https://resources.regroup.com/regroupkb/manage-communication-channels#manage-existing-channel-admins)
- [Setup Channel Subscriptions](https://resources.regroup.com/regroupkb/manage-communication-channels#setup-channel-subscriptions)
- [Manage Subscribers](https://resources.regroup.com/regroupkb/manage-communication-channels#manage-subscribers)
- [Manage Messages](https://resources.regroup.com/regroupkb/manage-messages#main-content)
- [WhatsApp Messaging](https://resources.regroup.com/regroupkb/manage-messages#whatsapp-messaging)
- [Set Up Message Defaults While Messaging](https://resources.regroup.com/regroupkb/manage-messages#set-up-message-defaults-while-messaging)
- [Message Templates](https://resources.regroup.com/regroupkb/manage-messages#message-templates)
[](http://www.regroup.com)
[mailto:email@email.com](mailto:email@email.com)
Copyright © 2026, Regroup Mass Notification