---
title: Manage Group Membership Using Custom Attribute Filters
description: You can use custom attribute filters to add and update group membership. Using custom attribute filters, you filter all organization contacts and add...
---
[Skip to content](https://resources.regroup.com/regroupkb/docs/manage-group-membership-using-custom-attribute-filters#main-content)
English
Show submenu for translations

Open main navigation
Close main navigation
- English
Show submenu for translations
- [Contact us](https://bit.ly/47rQCNC)
[Contact us](https://bit.ly/47rQCNC)
How can we help you?
- There are no suggestions because the search field is empty.
1. [Regroup Knowledge Base](https://resources.regroup.com/regroupkb)
2. [Configure Recipients and Admins](https://resources.regroup.com/regroupkb/configure-recipients-and-admins)
3. [Add Recipients to Groups](https://resources.regroup.com/regroupkb/configure-recipients-and-admins#add-recipients-to-groups)
# Manage Group Membership Using Custom Attribute Filters
You can use custom attribute filters to add and update group membership. Using custom attribute filters, you filter all organization contacts and add contacts with a specific attribute value to a group.
The processing style regulates the group membership import. For more information, see the topic, [Configure Processing Styles for Import](https://docs.regroup.com/docs/understanding-processing-styles/).
Here is how you set up custom attribute filters to add or update group contacts:
1. Click the **Recipients tab**. See the following image:
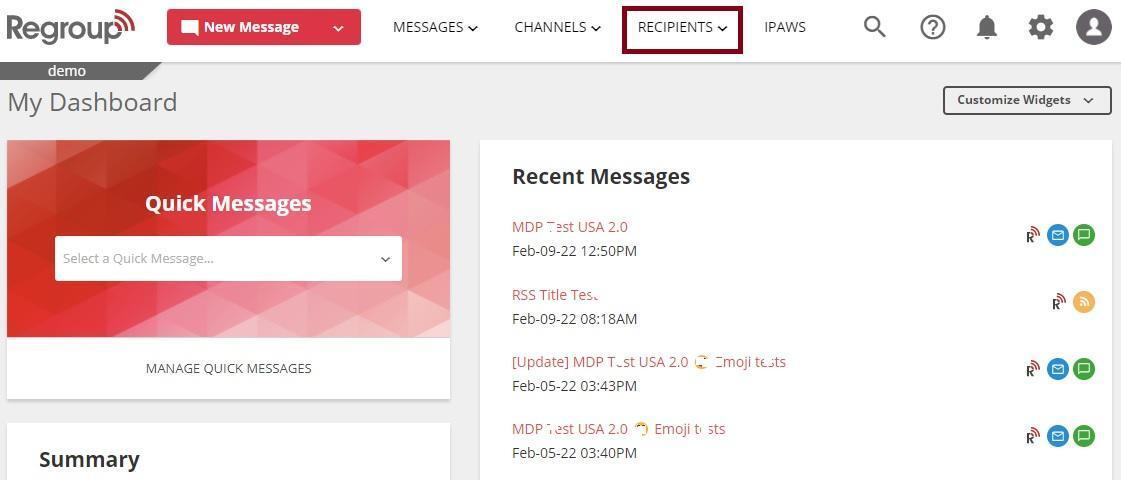
The My Groups page appears.
2. Search and locate the group to add the contacts in the **My Groups** tab. Organization admins can add contacts to the groups on the **All Groups** tab.
3. Click the group name and open it. Otherwise, click **Edit Group** from the vertical ellipsis. See the following image:
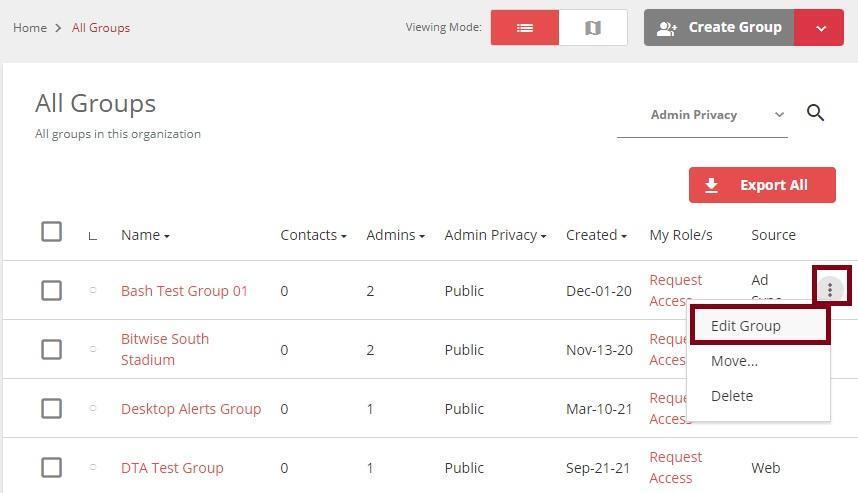
The **Group Settings** page opens.
4. Scroll down to the **Group Members** section on the left navigation panel and click **Import & Add Contacts**. See the following image:
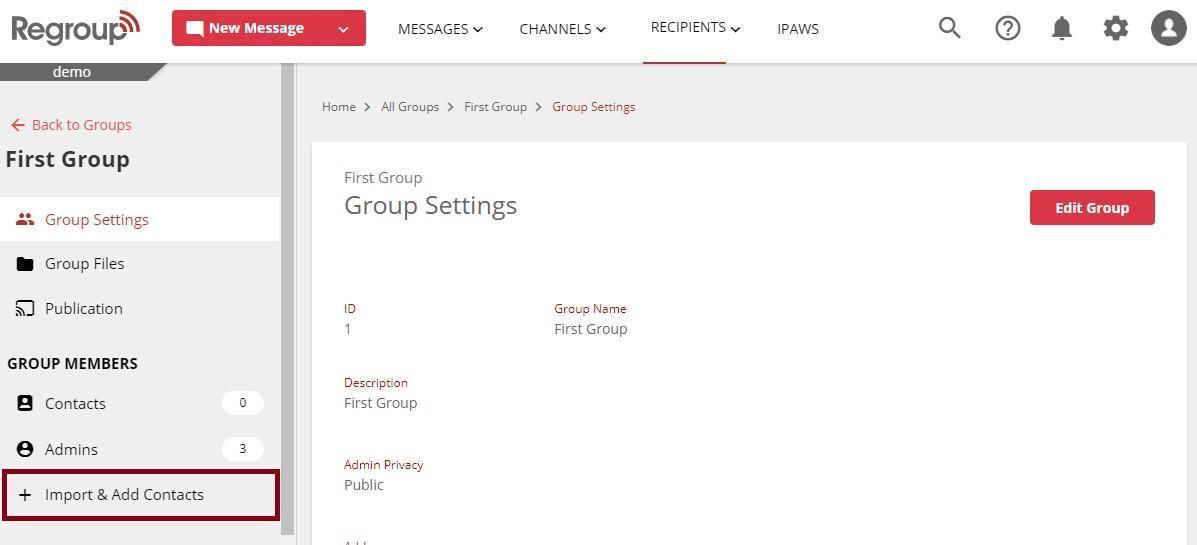
The Add Contacts page appears.
5. Click **Filter Using Custom Attribute** on the Add Contacts page. See the following image:
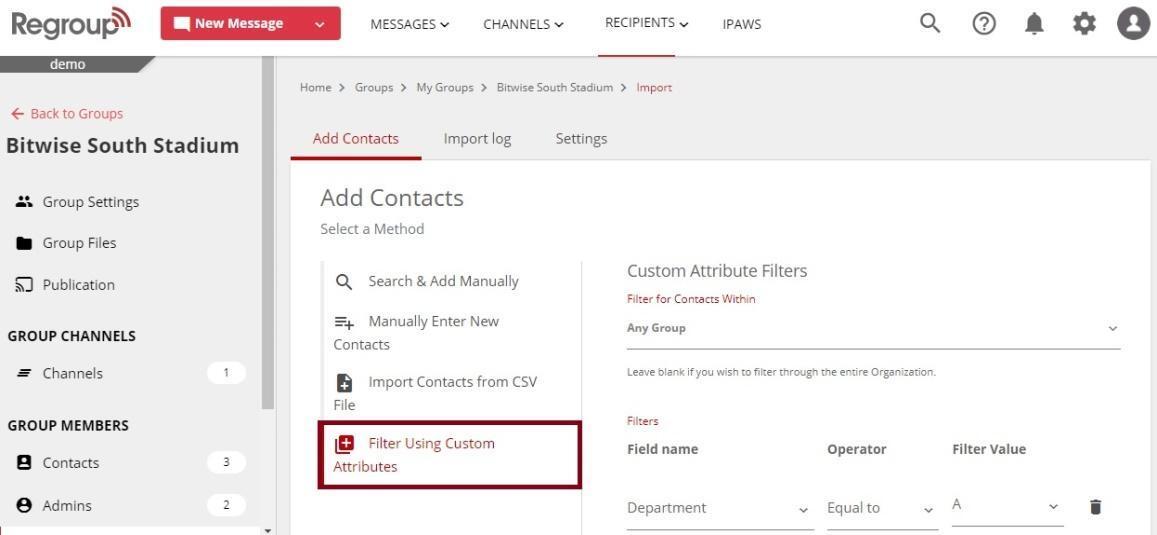
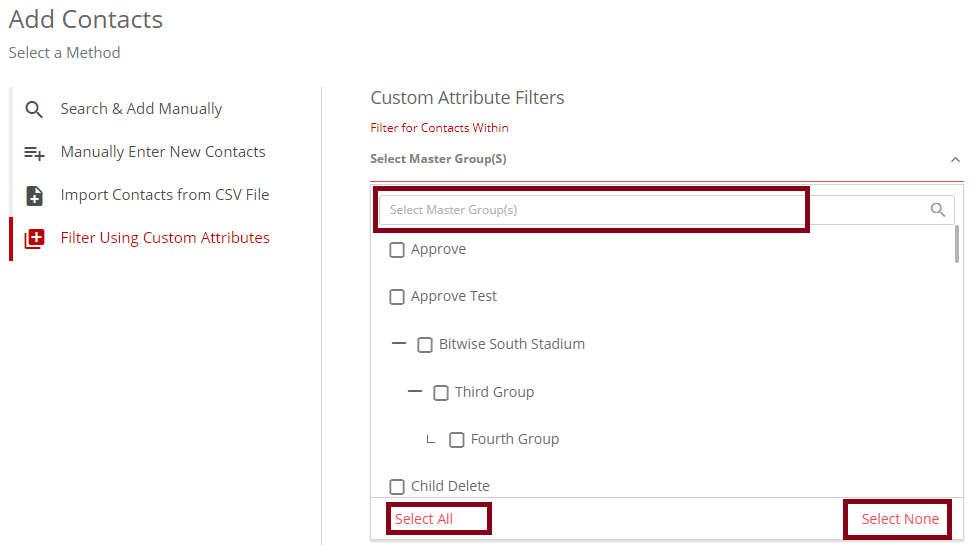
6. Click **Select Master Group** drop-down and select the groups from which you want to filter contacts.
7. You can also click **Select All** to select all organization groups and **Select None** to deselect all.
The following image highlights Any Group drop-down, Select All and Select None options:
In the **Filters** field, to create filters:
8. Click the **Field Name** drop-down and select the filter attribute.
9. Click the **Operator** drop-down and select the operator to determine how the selected attribute should complement its value.
10. Click the **Filter Value** drop-down and select the filter value based on which you want to create groups. You can see all the available values in the drop-down.
**Note**: If you cannot find the required custom attribute here, you must add the attribute in the Custom Attribute tab in the Contact Management section.
11. Click the **Add an AND Condition** to add the custom attribute based on which you want to filter the contacts into this group. See the following image:
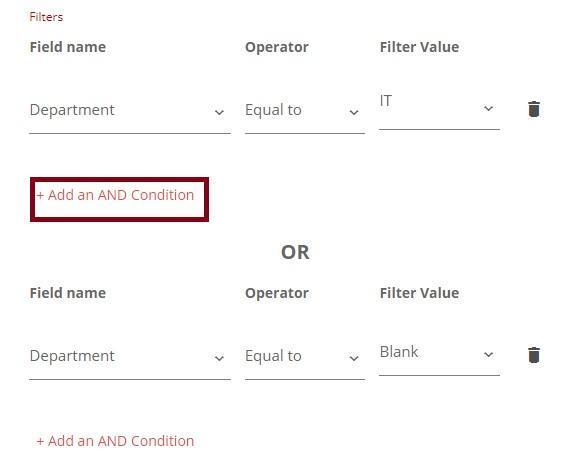
12. You can select **Operator** and the **Filter Value** for all the AND conditions you choose.
13. You can also click the **Add an OR Condition** button to add more conditions.
The system automatically filters and adds all contact with the selected combination of custom attribute values into the chosen group.
**For example**, you selected Department as a field, IT as its value, Status as the second filter and Officer as its value. Then, the system scans all the contacts in the selected groups and adds contacts with officer status in the IT department as members of this group.
14. In the **Filter Options** field, select one to determine how contacts are added to groups:
- **Add-Only**:Use for import only: Add new members to the group based on the custom attributes filters.
- **Add & Remove**: Use for Import & Expulsion: Add new members to the group per the filter attribute values and expel members who don’t fit the custom attribute filter requirements.
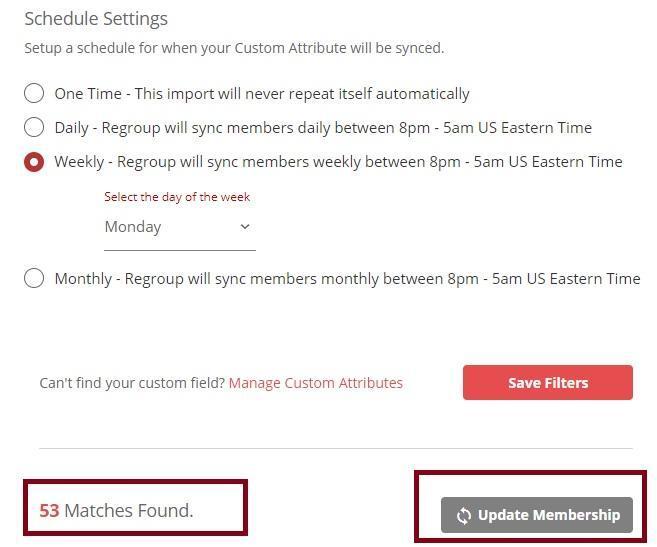
15. In the **Schedule Settings** field, you can select the system's frequency to sync data from new imports and other contact additions. The following are the options:
- **One Time** - The import doesn’t repeat itself automatically.
- **Daily** - Regroup syncs members daily between 8 p.m. - 5 a.m. US Eastern Time. If you select daily, select the time of the day from the drop-down.
- **Sync at the immediately available slot** after the organization-level SFTP import.
- **Weekly** - Regroup syncs members weekly between 8 p.m. - 5 a.m. US Eastern Time. If you select weekly, select the day of the week from the drop-down.
- **Monthly** - Regroup syncs members monthly between 8 p.m. - 5 a.m. US Eastern Time.
16. You can click the **Update Membership** button to immediately add or remove the contacts without saving the filters. The following image shows the update membership button and the contacts filtered to add to your group:
17. Click **Yes** to confirm adding the contacts to the group. You can see the import status of the contacts.
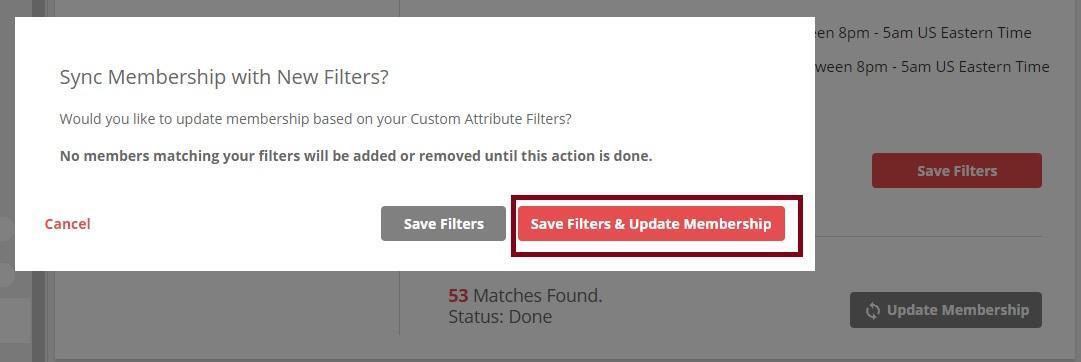
18. You can also click **Save** **Filters** to save the filters for later use and add contacts.
19. Select either of the options to confirm saving the filter or save the filter along with the membership update:
- [Getting started](https://resources.regroup.com/regroupkb/getting-started)
- [Incident Management](https://resources.regroup.com/regroupkb/incident-management)
- [Set Up Organization Account](https://resources.regroup.com/regroupkb/set-up-organization-account#main-content)
- [Organization Setting](https://resources.regroup.com/regroupkb/set-up-organization-account#organization-setting)
- [Configure Organization Sign-Up Pages](https://resources.regroup.com/regroupkb/set-up-organization-account#configure-organization-sign-up-pages)
- [Manage Group Automation](https://resources.regroup.com/regroupkb/set-up-organization-account#manage-group-automation)
- [Configure Message Default Settings](https://resources.regroup.com/regroupkb/set-up-organization-account#configure-message-default-settings)
- [Manage Add-Ons](https://resources.regroup.com/regroupkb/set-up-organization-account#manage-add-ons)
- [Configure Social Media Preferences](https://resources.regroup.com/regroupkb/set-up-organization-account#configure-social-media-preferences)
- [View and Download Message Reports](https://resources.regroup.com/regroupkb/set-up-organization-account#view-and-download-message-reports)
- [Configure Contacts Management](https://resources.regroup.com/regroupkb/configure-contacts-management)
- [Set Up Admins and Roles](https://resources.regroup.com/regroupkb/set-up-admins-and-roles#main-content)
- [Manage Roles](https://resources.regroup.com/regroupkb/set-up-admins-and-roles#manage-roles)
- [Managing Existing Admins](https://resources.regroup.com/regroupkb/set-up-admins-and-roles#managing-existing-admins)
- [Manage Roles](https://resources.regroup.com/regroupkb/manage-roles)
- [Manage Groups](https://resources.regroup.com/regroupkb/manage-groups#main-content)
- [Create Groups Using Import](https://resources.regroup.com/regroupkb/manage-groups#create-groups-using-import)
- [Add Groups Using FTP Import](https://resources.regroup.com/regroupkb/manage-groups#add-groups-using-ftp-import)
- [Create or Update Group Hierarchy](https://resources.regroup.com/regroupkb/manage-groups#create-or-update-group-hierarchy)
- [Manage Group Files](https://resources.regroup.com/regroupkb/manage-groups#manage-group-files)
- [Manage Group Admin Profile](https://resources.regroup.com/regroupkb/manage-groups#manage-group-admin-profile)
- [Export Groups](https://resources.regroup.com/regroupkb/manage-groups#export-groups)
- [Configure Recipients and Admins](https://resources.regroup.com/regroupkb/configure-recipients-and-admins#main-content)
- [Add Recipients to Groups](https://resources.regroup.com/regroupkb/configure-recipients-and-admins#add-recipients-to-groups)
- [Manage Group Contacts](https://resources.regroup.com/regroupkb/configure-recipients-and-admins#manage-group-contacts)
- [Manage Organization Contacts](https://resources.regroup.com/regroupkb/configure-recipients-and-admins#manage-organization-contacts)
- [Manage Floating Contacts](https://resources.regroup.com/regroupkb/configure-recipients-and-admins#manage-floating-contacts)
- [Manage Communication Channels](https://resources.regroup.com/regroupkb/manage-communication-channels#main-content)
- [Create Channels](https://resources.regroup.com/regroupkb/manage-communication-channels#create-channels)
- [Create Channels Using Import](https://resources.regroup.com/regroupkb/manage-communication-channels#create-channels-using-import)
- [Setup Channels](https://resources.regroup.com/regroupkb/manage-communication-channels#setup-channels)
- [Create and Manage Sender Profiles](https://resources.regroup.com/regroupkb/manage-communication-channels#create-and-manage-sender-profiles)
- [Setup Social Media](https://resources.regroup.com/regroupkb/manage-communication-channels#setup-social-media)
- [Add Recipients to Channel](https://resources.regroup.com/regroupkb/manage-communication-channels#add-recipients-to-channel)
- [Manage Existing Channel Admins](https://resources.regroup.com/regroupkb/manage-communication-channels#manage-existing-channel-admins)
- [Setup Channel Subscriptions](https://resources.regroup.com/regroupkb/manage-communication-channels#setup-channel-subscriptions)
- [Manage Subscribers](https://resources.regroup.com/regroupkb/manage-communication-channels#manage-subscribers)
- [Manage Messages](https://resources.regroup.com/regroupkb/manage-messages#main-content)
- [WhatsApp Messaging](https://resources.regroup.com/regroupkb/manage-messages#whatsapp-messaging)
- [Set Up Message Defaults While Messaging](https://resources.regroup.com/regroupkb/manage-messages#set-up-message-defaults-while-messaging)
- [Message Templates](https://resources.regroup.com/regroupkb/manage-messages#message-templates)
[](http://www.regroup.com)
[mailto:email@email.com](mailto:email@email.com)
Copyright © 2026, Regroup Mass Notification