
Overview
Regroup allows you to notify recipients with automated alerts from the National Weather Service (NWS) and National Oceanic Atmospheric Administration (NOAA).
Note: NOAA Alerts is an add-on feature. Contact Regroup to enable this feature in your organization.
To broadcast alerts, you’ll need to enable the NOAA add-on and configure Alert Triggers within your Regroup channels. When setting up an alert trigger, you can apply filters based on Counties, Locations, Alert Types, or Events. Each channel supports only one unique combination of these filters. For a complete list of events available through NOAA, refer to the Emergency Alert System (EAS) Event Codes.
When enabled, Regroup monitors all NOAA alerts, filters them based on your configured criteria, and sends them through a selected channel automatically. These alerts are location-based and do not require admin approval—even if approval is enabled on the channel. Contacts may also configure quiet hours per event code.
Step-by-Step: Configure Alert Triggers for a Channel
Step 1: Go to Channels
-
Click the Channels tab.
-
The My Channels page opens.
-
Locate the desired channel using the Search bar.
-
Org admins can also use the All Channels tab.
-
Click the channel name to open it.
Step 2: Access Alert Triggers
-
On the left navigation panel, click Alert Triggers.
The Alert Triggers page appears.
Step 3: Enable NOAA Alerts
Check the box to Enable automated NOAA Alerts for this channel.
Step 4: Set Alert Type and Location
-
Click the Type dropdown and select one of the following:
-
County Based: Generates NOAA alerts for selected countries. After selecting the Country Based type, choose the required counties from the Country drop-down list. Alerts issued for those counties are then sent to the channel recipients.
-
Location Based: Generates NOAA alerts based on a defined geographic location. After selecting this option, enter a physical address in the Location field. The system uses the polygon associated with the NOAA alert to determine whether the specified location falls within the affected geographic area. If the entered address is within the NOAA alert polygon, the alert is generated and sent to the channel recipients. If the address falls outside the polygon, the alert is not generated for the channel.
-
County and Location-Based: Generates NOAA alerts using a combination of county-level and location-based targeting. An alert is generated and sent to the channel recipients only when the NOAA alert matches the selected county and the specified location falls within the polygon associated with NOAA alert.
-
Recipient Address Based: NOAA alerts are sent to recipients whose profile address falls within the polygon that defines the affected geographic area of the NOAA alert. Only recipients whose profile address is within the NOAA alert polygon receive the notification through the channel. Recipients without an address in their profile will not receive NOAA alerts through this channel.
-
Live-Location Based: NOAA alerts are sent based on recipients’ real-time location from the Regroup Mobile App. The system uses the polygon associated with the NOAA alert to determine whether a recipient’s live location falls within the affected geographic area. Only recipients whose live location is within the NOAA alert polygon receive the notification. Recipients must be using an active Regroup Mobile app session with all relevant location-sharing permissions enabled.
-
-
From the Counties dropdown, select the relevant county. This field is displayed when you select Country Based or Country and Location Based from the Type dropdown.
-
In the Location field, enter a physical address recognized by NOAA. This field is displayed when you select Location Based or Country and Location Based from the Type dropdown.
(Optional) Click Add another location to include additional locations.
Step 5: Configure Auto-Translation (Optional)
The AUTO-TRANSLATION section appears under Alert Triggers only when:
-
NOAA Alerts are enabled for the channel, and
-
The Auto-Translation feature is enabled for your organization.
If both features are active, you will see the option:
Enable auto-translation for NOAA alerts
To enable:
-
Check the box.
-
Click Save.
When enabled, NOAA alerts are automatically translated into each recipient’s preferred language.
When disabled (default setting), NOAA alerts are delivered in the original/default language.
-
Click Save.
When enabled, NOAA alerts are automatically translated into each recipient’s preferred language.
When disabled (default setting), NOAA alerts are delivered in the original/default language.
Step 6: Select Alert Events
-
Click the ALERT EVENTS dropdown.
-
Select one or more alert event codes.
-
Use Select All or Unselect All for bulk actions.
-
Refer to the NWRNWS Event Codes for details.
Step 7: Choose Alert Delivery Methods
-
Click the Alert Methods dropdown.
Select one or more delivery methods (e.g., SMS, Email, Push Notification).
Step 8: Configure Quiet Hours (Optional)
-
Click the Quiet Hours checkbox.
-
For each selected event:
-
Choose the days for quiet hours.
-
Select the Time From and Time To values.
-
Set your Time Zone.
Step 9: Configure Priority Order (Optional)
You can set a Delivery Priority Order for each NOAA event, allowing notifications to be delivered through methods such as Email, SMS, Call, and Regroup Mobile in your preferred sequence.
To configure delivery priority order for each NOAA event:
-
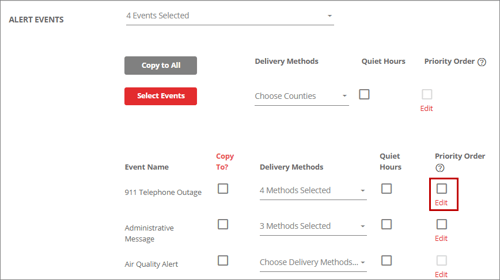
Click the Priority Order checkbox for a NOAA event.
Note: To define the Priority Order for a NOAA event, at least two delivery methods must be selected. If fewer than two delivery methods are selected for an event, the Priority Order checkbox is disabled for that event.
-
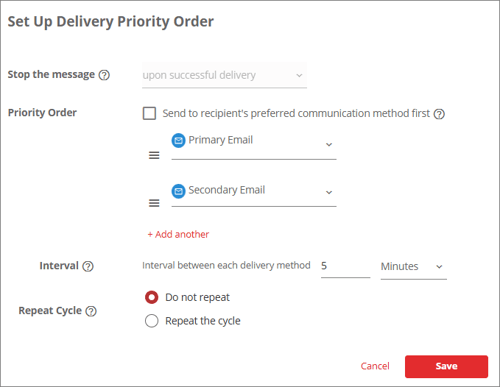
In the Set Up Delivery Priority Order dialog, specify the parameters to configure the priority order for the selected event. For more information about the parameters used to configure delivery priority order, see the Priority Order topic.
Step 10: Select a Sender Profile
-
Click the Choose Sender Profile dropdown.
-
Select an existing sender profile.
-
You can only view sender profiles shared with you, the channel, or all admins.
-
-
(Optional) Click View Profile Info to see details.
-
(Optional) Click New Sender Profile to create one.
See the help topic Create Sender Profiles (from Step 3 onward) for guidance.
Step 11: Save Your Settings
-
Click Save to finalize the configuration.
Notes
-
NOAA alerts bypass approval settings and are sent automatically.
-
Recipients can set personal quiet hours per event code.
-
Message Details show NOAA’s alert polygon for location-based alerts.
For a full list of EAS Event Codes, refer to NOAA’s official list.
Important Information Regarding Suppressing NOAA Message Types
When enabling NOAA Alerts, you’ll see the option “Suppress the following NOAA Message Types.” This optional feature allows you to exclude certain NOAA message types for 12 hours from the time the first alert is received.
To access this setting:
Go to Organization Settings → Add-ons → Search “NOAA” → Check “Suppress the following NOAA Message Types.”
Then, use the dropdown menu to select which message types to suppress:
- Update/Continuation and Expiration
- Cancel
Note: Suppressed alert types are not sent to your designated audience during the 12-hour window.
While this option helps reduce redundant alerts, it’s important to understand how each message type works—especially Cancel messages.
For example, if NOAA issues a cancellation for an emergency (e.g., a tornado threat that has passed) and the Cancel message is suppressed, your recipients may continue to believe the emergency is still active. This could cause unnecessary concern or operational confusion.
It is always recommended to receive all alert types to stay fully informed of critical weather updates from NOAA.