
You can edit a contact profile to update the contact information, default delivery methods, preferred communication, quiet hours, or custom attributes on the Contact Information page.
There are multiple ways to reach the Contact Information page.
Tip: You can skip steps 1- 7 if you’re already on the Contact Information page.
This topic covers the following tasks. You can search and directly go to the required set of tasks from step 8 onwards and save your changes.
-
Navigate to the Contact Information page.
-
contact’s information (steps 7-9)
-
email addresses (steps 8)
-
phone numbers (steps 9)
-
Address (step 10)
-
Setup quiet hours for groups and channels (step 11)
-
Update the time zone (step 13)
-
Select the preferred communication language (step 14)
-
Choose a preferred communication method (step 15)
-
Update custom attributes (step 16)
-
Change account password (step 17)
-
Add Contact to a group and update the group’s quiet hour and delivery methods (steps 18)
-
Manage group subscriptions (step19)
-
Add channel subscription, quiet hours, and email digest (step 20 and 21)
-
Access all files shared with the contact (step 21)
The following procedure explains how to update the contact profile:
-
Click the Recipients tab. See the following image :
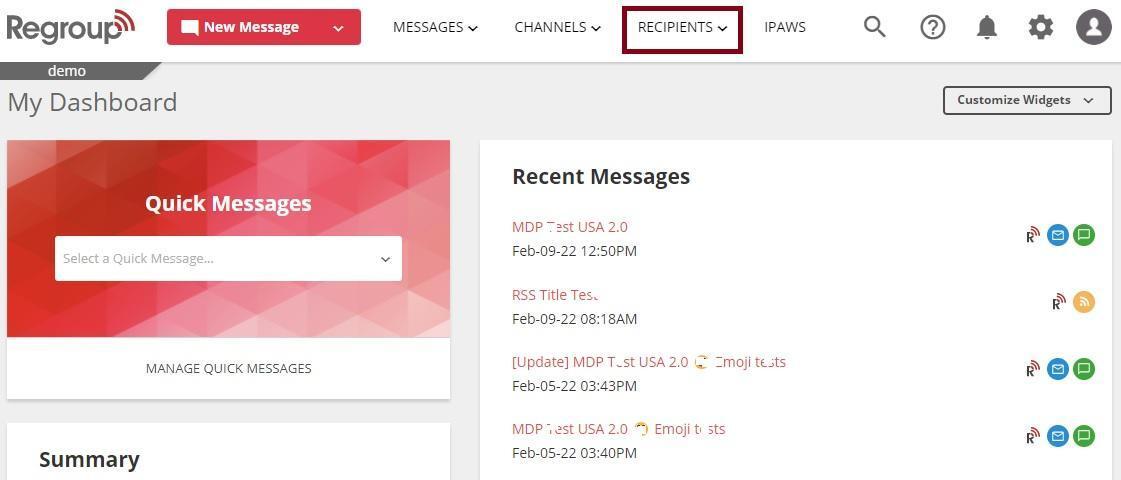
The My Groups page appears.
-
Search and locate the group you want to update in the My Groups tab. The organization admins can edit groups on the All Groups tab too.
-
Click the group name and open the group. Otherwise, click Edit Group on the vertical ellipsis on the right side of the group list.
See the following image:
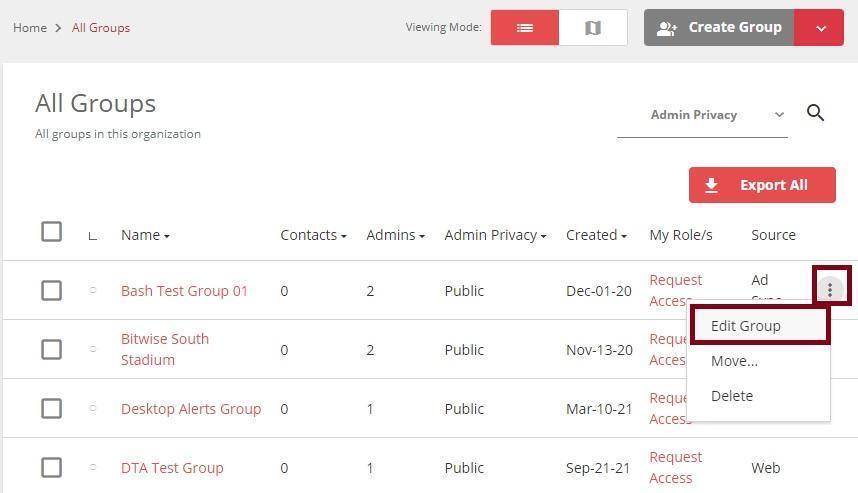
The Group Settings page opens.
-
Scroll down to the Group Members section on the left navigation panel and click Contacts to see all the contacts. The following image highlights the contacts tab:
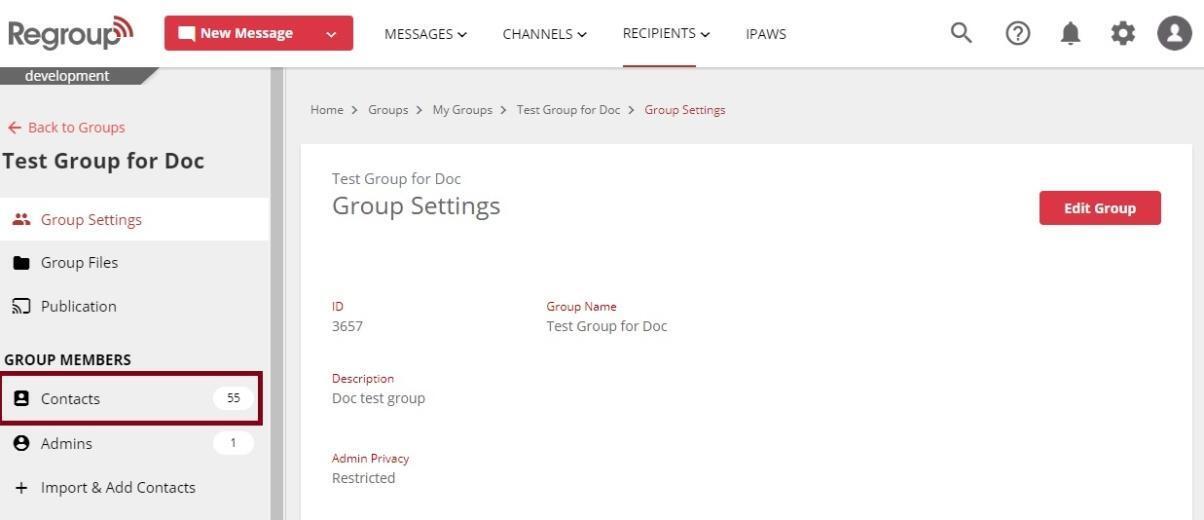
-
Search and locate the contact profile you want to edit. You can search using the name, mail ID, or any custom attribute.
-
Click the contact's name to open the profile, or click Edit Contact on the vertical ellipsis on the right side of the contact list. The following image shows the edit contact option:
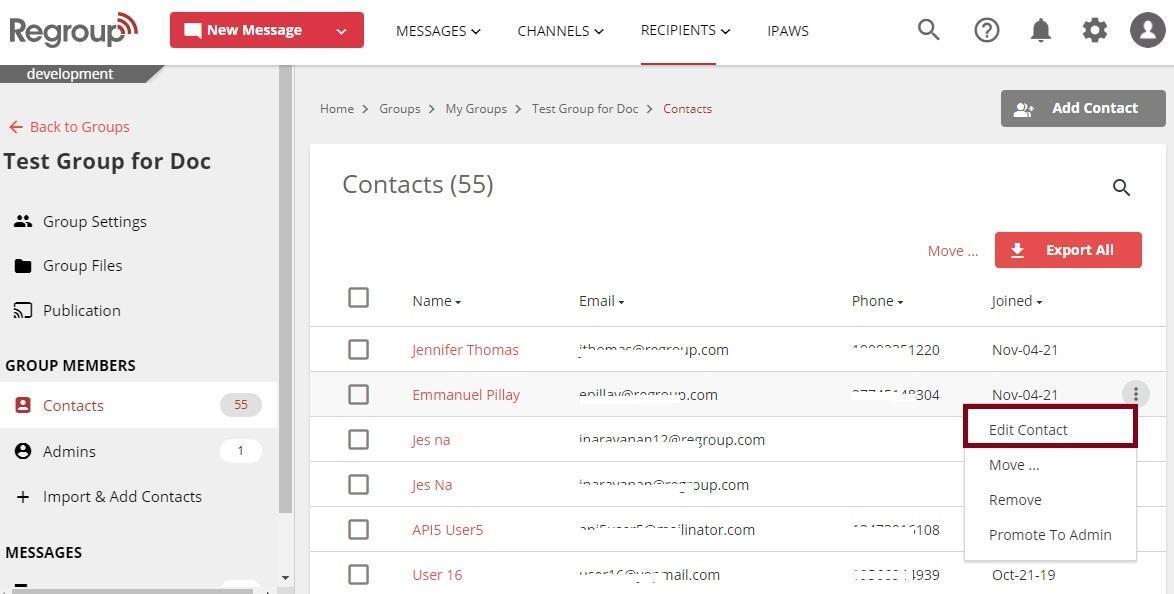
The Contact Information page opens.
-
To add or update contact information:
-
Click the First Name field to update the name.
-
Click the Last Name fields and enter updates.
-
Click and enter or update the Username
-
Click and enter or update the Database ID.
-
-
To manage or add email addresses:
-
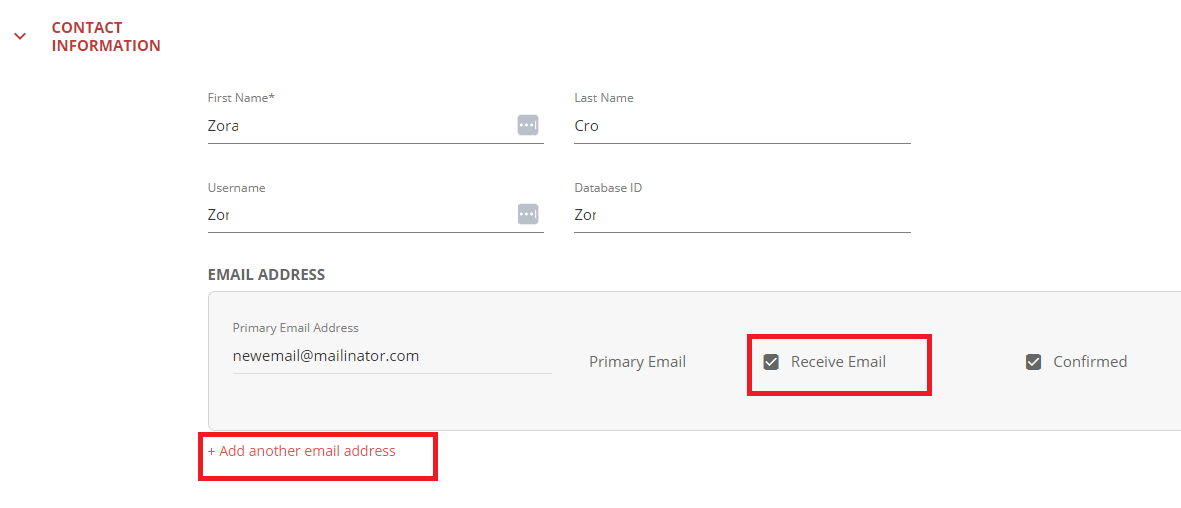
Click Add another email address to add a new email address.
-
Enter the email in the Email Address field.
Note: You cannot update the primary email address unless you have another email ID added and made it primary.
-
Click to enable or disable the Receive Email checkbox to start or stop receiving emails. See the following image:
-
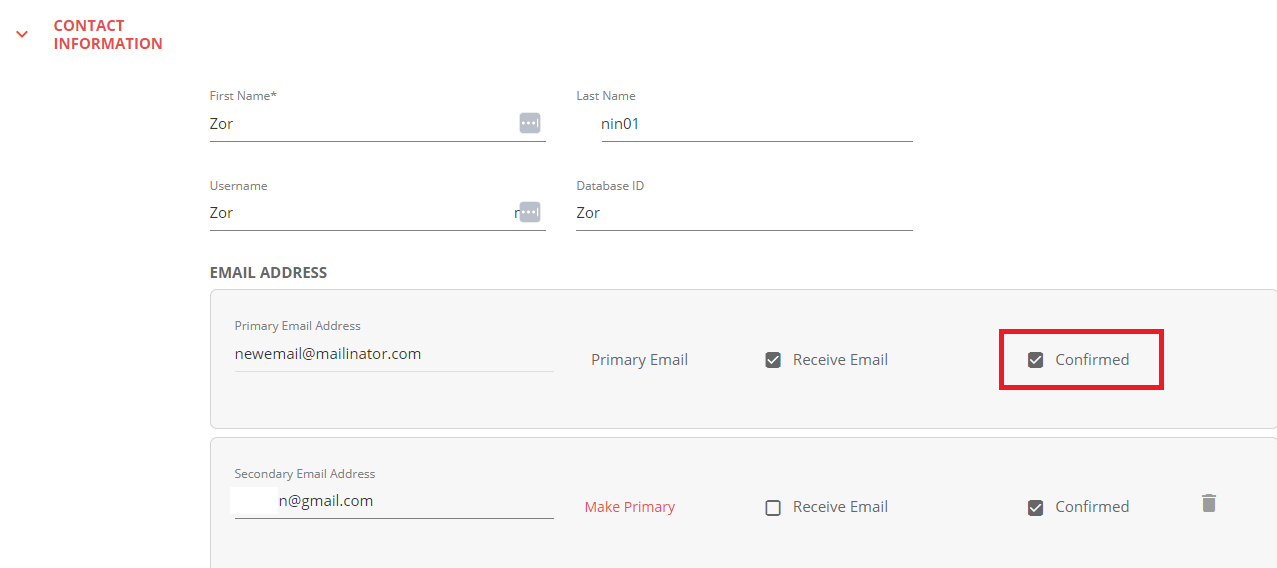
Click the Confirmed checkbox to let the system know the email address is confirmed as active. See the following image:
-
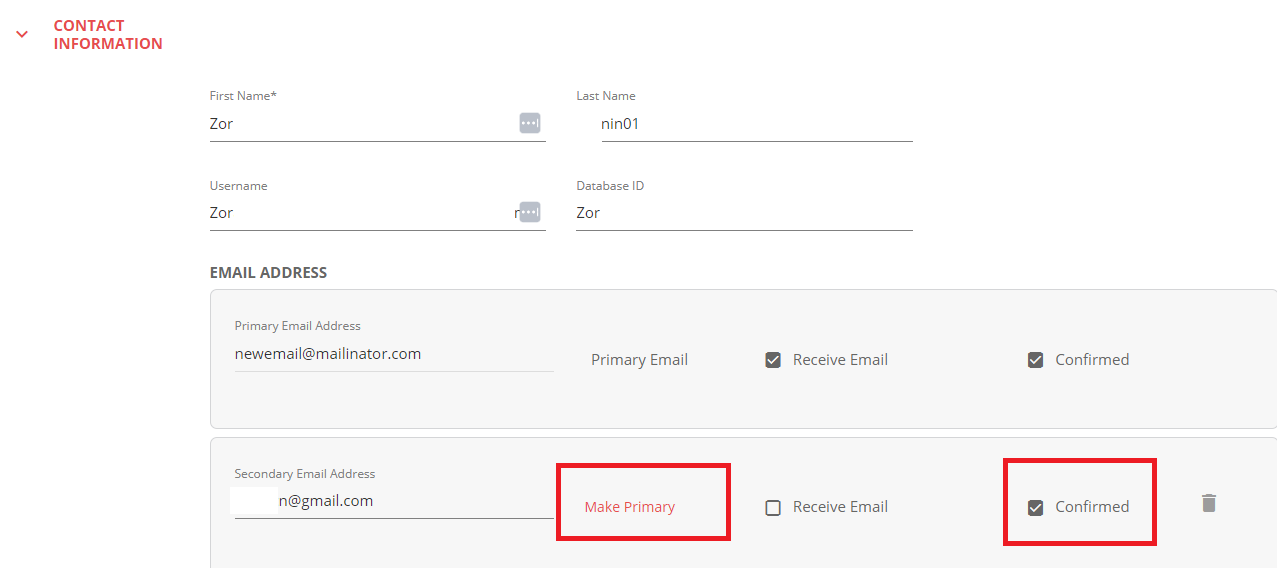
To make a secondary email address a primary email, click the Confirmed checkbox to confirm the number is active and click Make Primary. See the following image:
-
You can click the Delete icon to delete any email address.
-
-
To manage or add phone numbers:
-
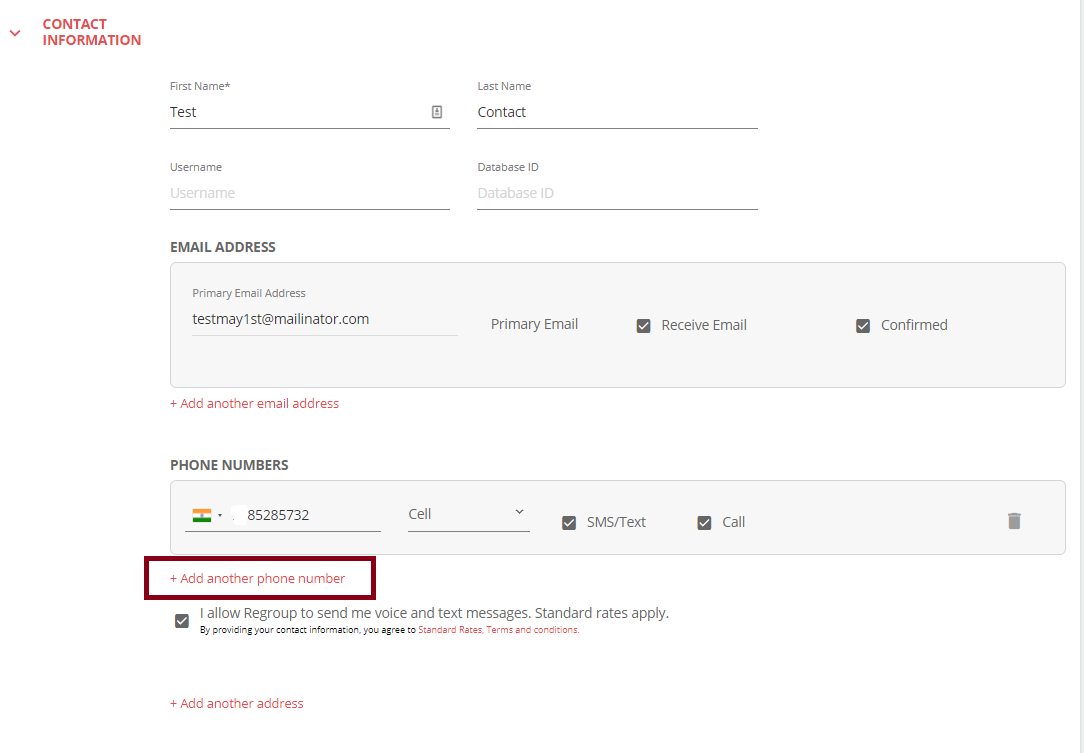
Click Add another phone number to add a new phone number. See the following image:
-
Click the Type checkbox to select from the dropdown the phone type such as Home, Work, Cell and Other.
-
Select the country code from the dropdown by clicking the flag icon.
-
Enter the phone number in the Phone Number field.
-
Click the SMS/Text checkbox to enable receiving messages in this number.
-
You can click the Delete icon to delete any phone number.
-
Click the consent checkbox to allow Regroup to send messages and calls to the number.
Note: By providing your contact information, you agree to the service's standard rates that may incur.
-
To edit an existing phone number, click on the phone number and make the changes, then click Save Finish.
-
-
To add contact address:
-
Click +Add another address. See the following image:
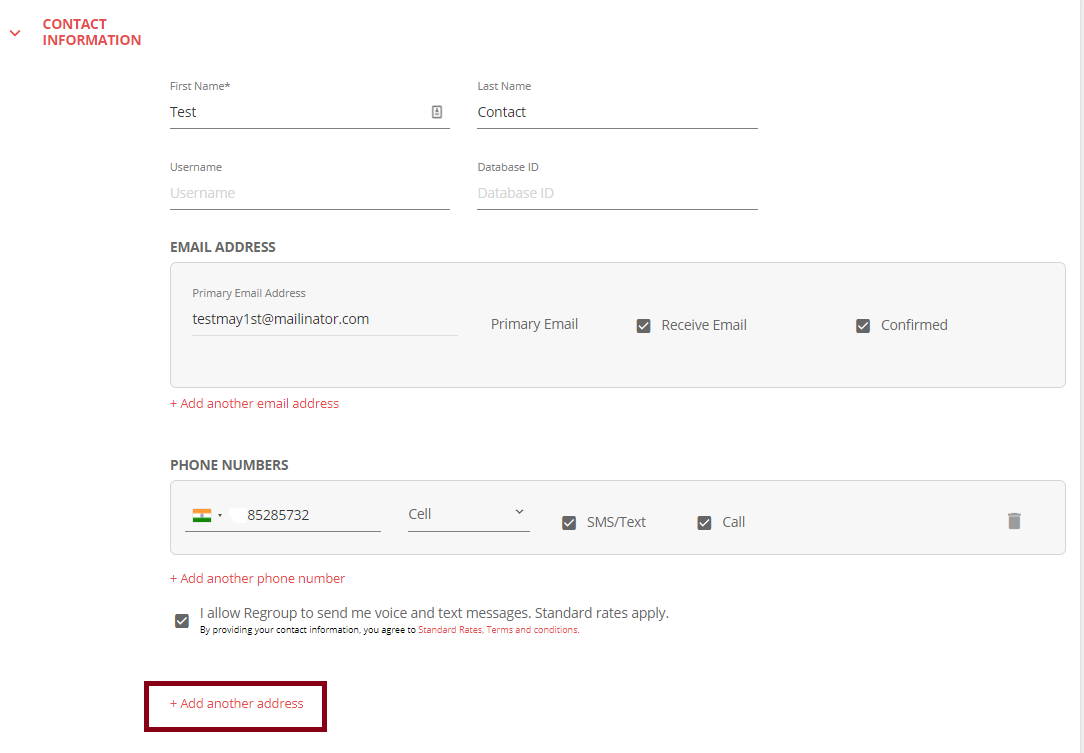
The Address field opens.
-
To enter the address manually, click each field and enter the respective value.
Tip: The Zip and Country are mandatory fields.
-
To locate the address using the map, click Select using Map. See the following image:
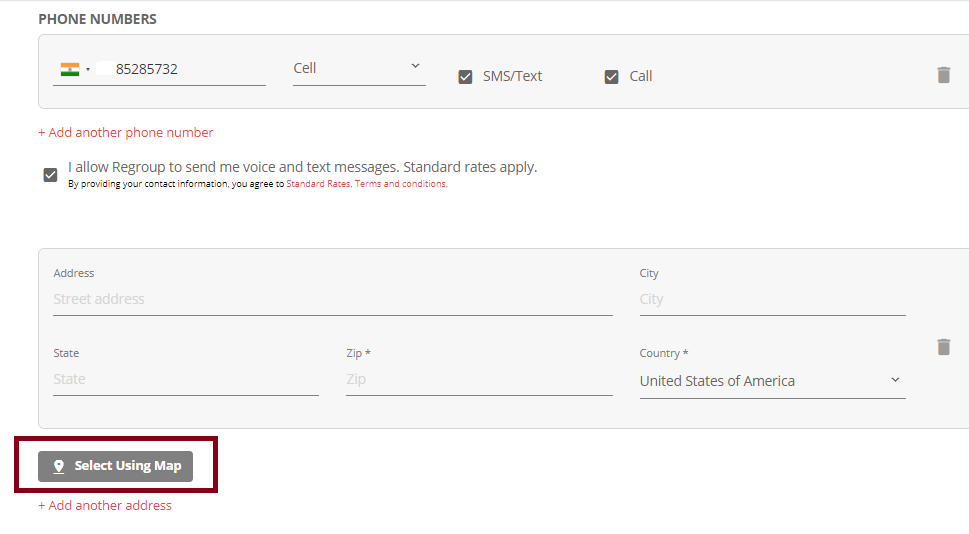
The Choose Map Location page opens.
-
Enter the address on the map’s search field and select the correct address. See the following image:
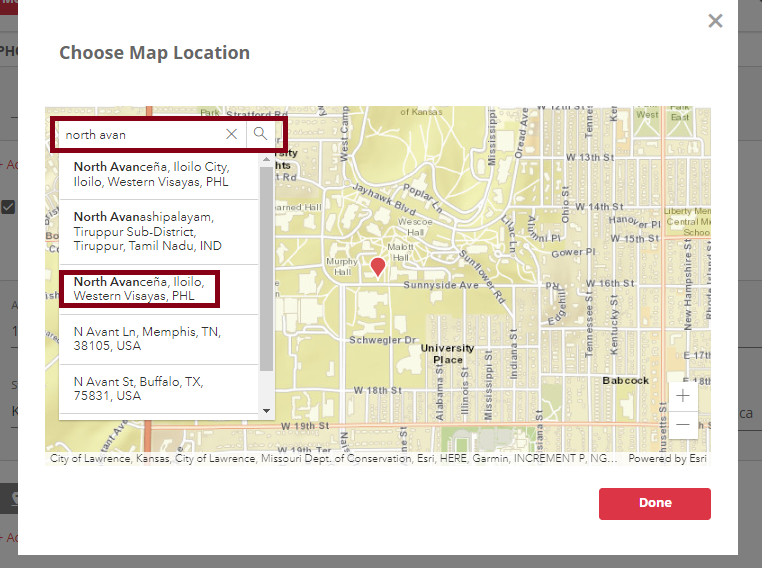
The map gets adjusted with the selected location.
Tip: You can select the current location as well.
-
Click Done.
-
-
To set up or update the quiet hours for contacts:
Note: If the feature Suppress messages sent during quiet hours is enabled from the Advanced tab or the organization settings, contacts won't receive non-urgent messages sent during their quiet hours, even after the quiet hour window.
To enable, See the topic, Advanced Organization Settings.
-
Click Set Quiet Hours for checkbox. See the following image:
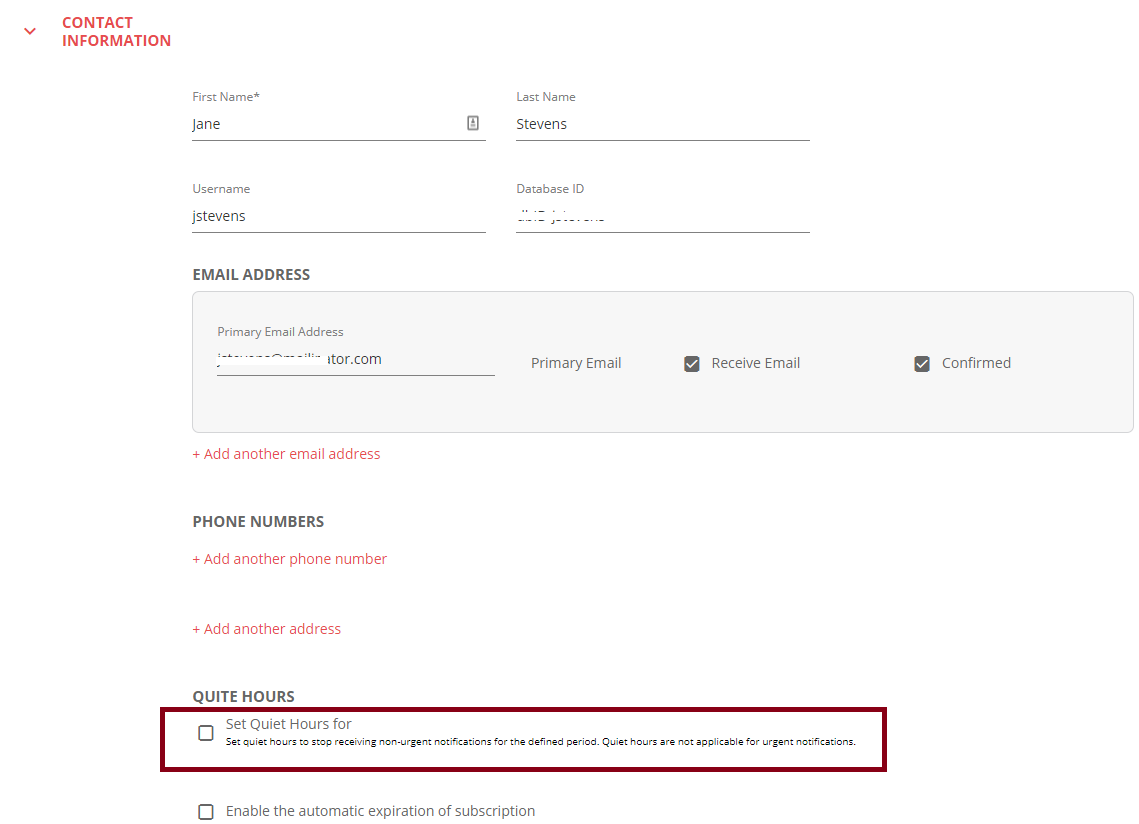
-
Select the days. The following image shows Sunday selected:
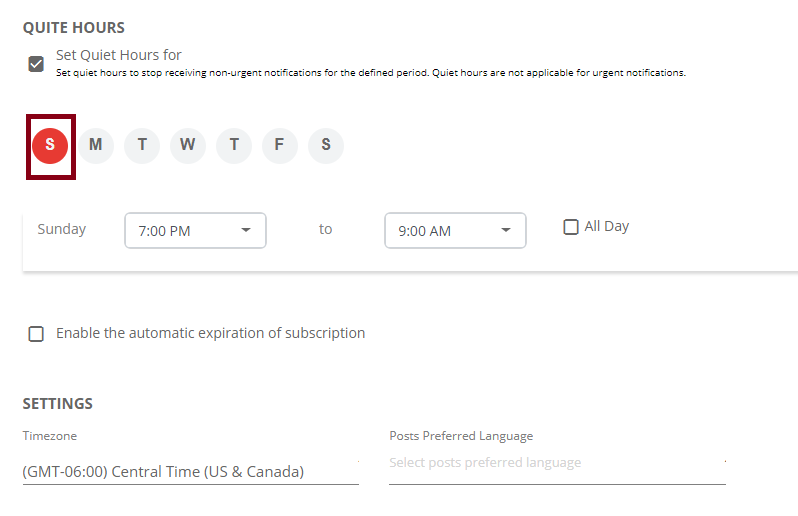
-
Click on the time and move up or down to select the required time.
Tip: You can click on the time in the drop-down to select time from a 12-hour chart. See the following image:
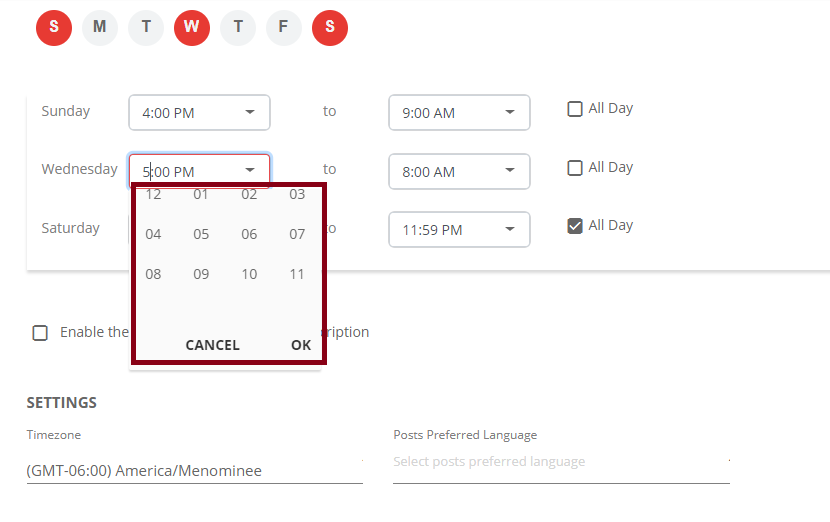
Tip: If you select work days, the selected default time is set as after work hours (5 PM to 8 AM). You can update the default time. If you select All Day, the system selects time from 12:00 AM to 11:59 PM.
-
Click Ok. See the following image:
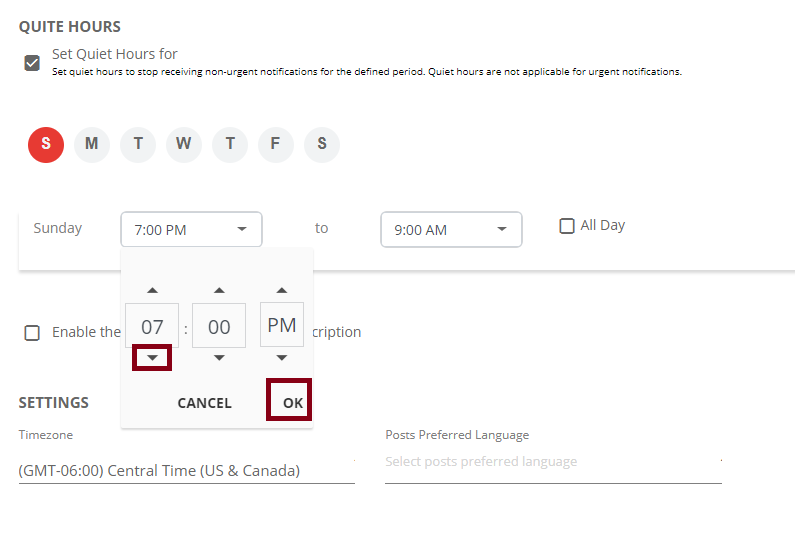
-
You can click All Day checkbox to set quiet hours for the whole day.
Note: If the organization has suppressed delivering messages sent during quiet hours, contacts will never receive the messages sent during their quiet hours.
See the following image:
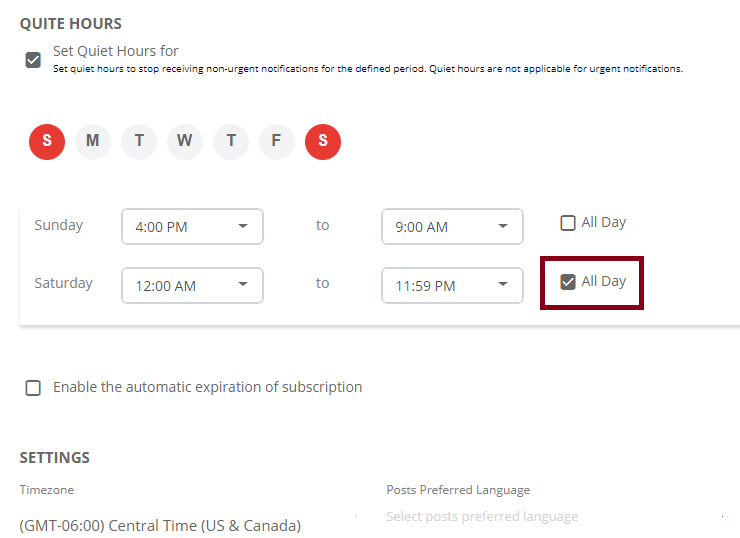
-
-
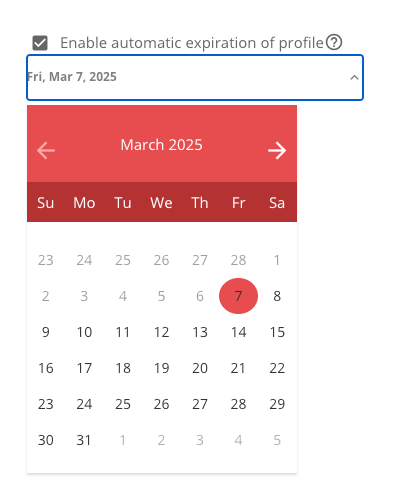
Click Enable the automatic expiration of subscription checkbox to select a date when all subscriptions of the contact will expire. The contact is removed from the organization on the chosen date.
-
To update your time zone, click the Time Zone dropdown and select the required time.
-
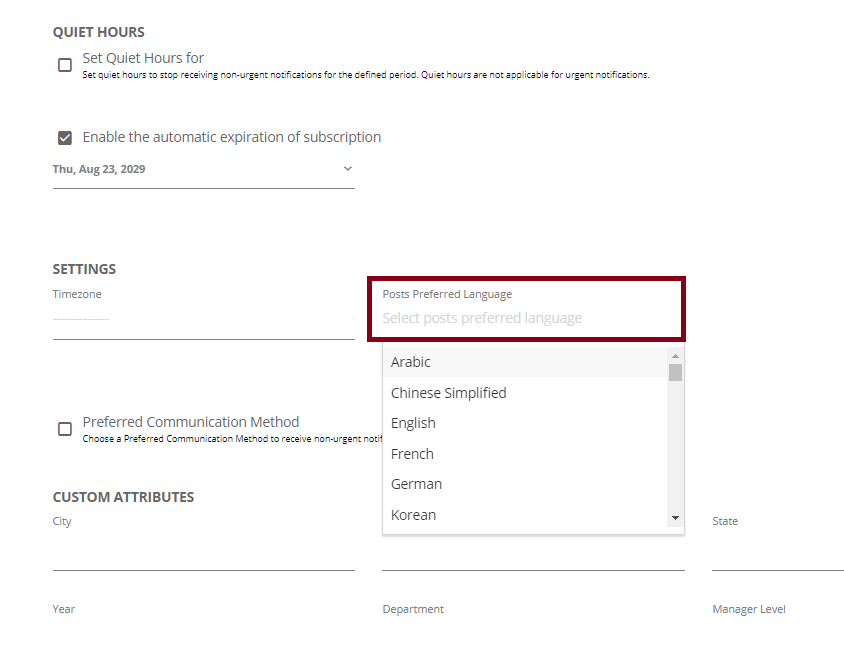
To select the language to receive posts, click the Posts Preferred Language dropdown and select the required language.
See the following image:
-
Preferred Communication Method
This option is available only if the free add-on is enabled through Settings > Add-ons.
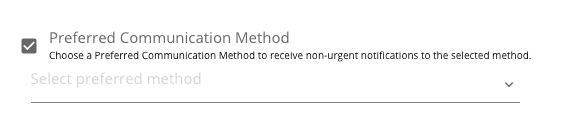
Check the Default Preferred Communication Method box and open the Select Preferred Method drop-down menu.
Choose from Email, Text, Call, or Push Notification as the preferred communication method. Only options corresponding to the contact’s available data will be shown.
If selecting Phone or Email, an additional drop-down will allow you to specify the phone or email type.

-
In the Custom Attributes segment, click to update each attribute field with the correct information.
Note: This is available only if your organization has set custom attributes.
-
To change the contact account‘s password.
-
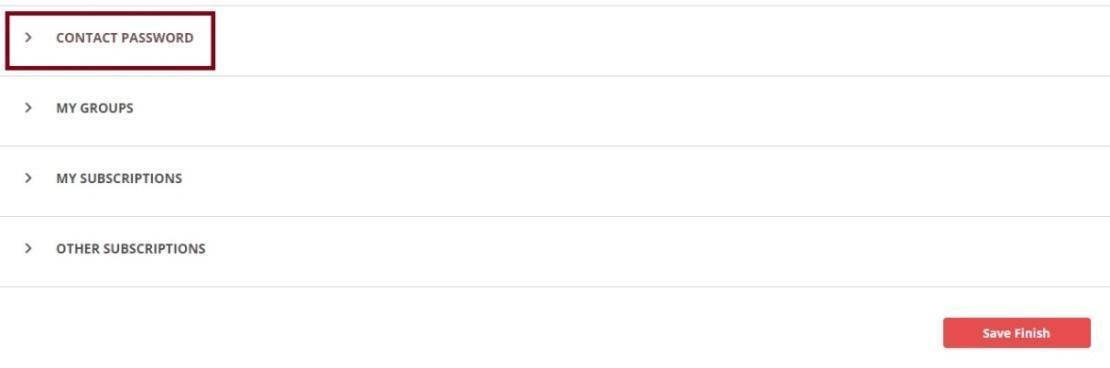
Click the Contact Password dropdown. See the image:
-
Enter the new password in the Enter New Password field.
-
Confirm the new password in the Repeat New Password field.
-
Click Save.
-
-
You can add the contact to a group in the My Groups section. You can also update the existing group settings. To add the contact to a group and update the fields:
-
Click My Group dropdown.
-
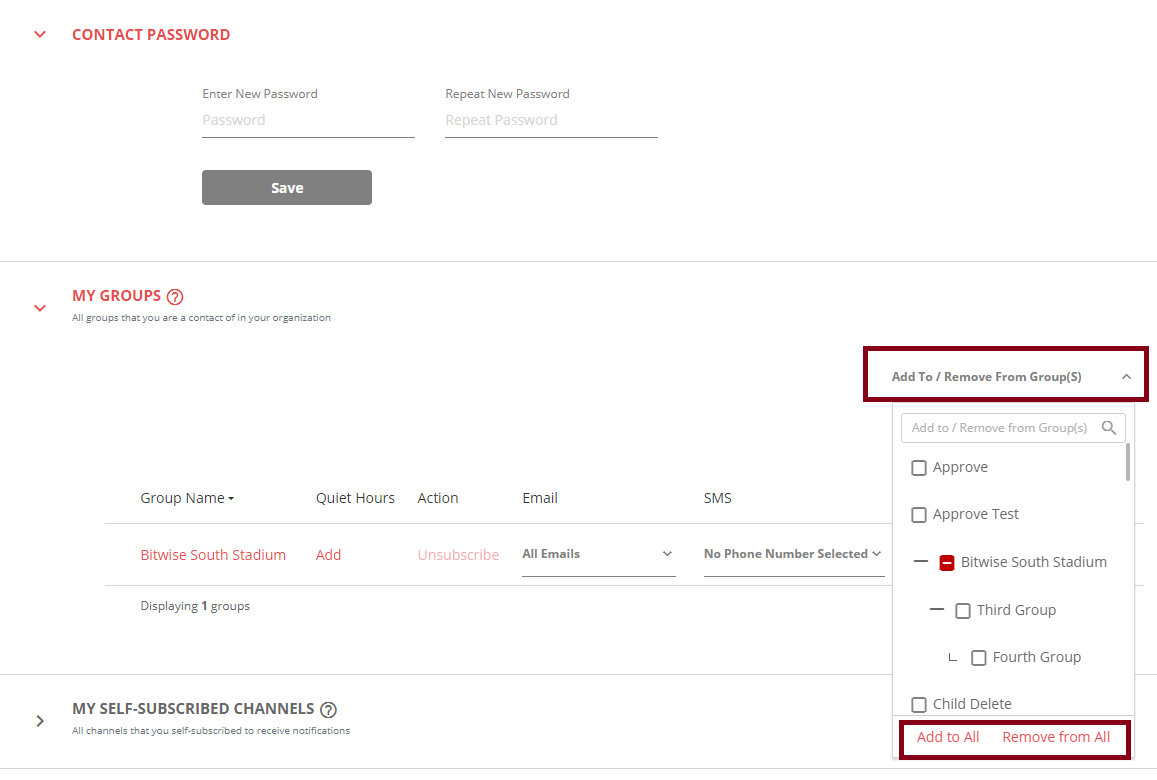
Click Add to or Remove From Groups dropdown and select groups to which you want to add contacts. See the following image:
-
You can click Add to All or Remove from All to make bulk addition or deletion.
-
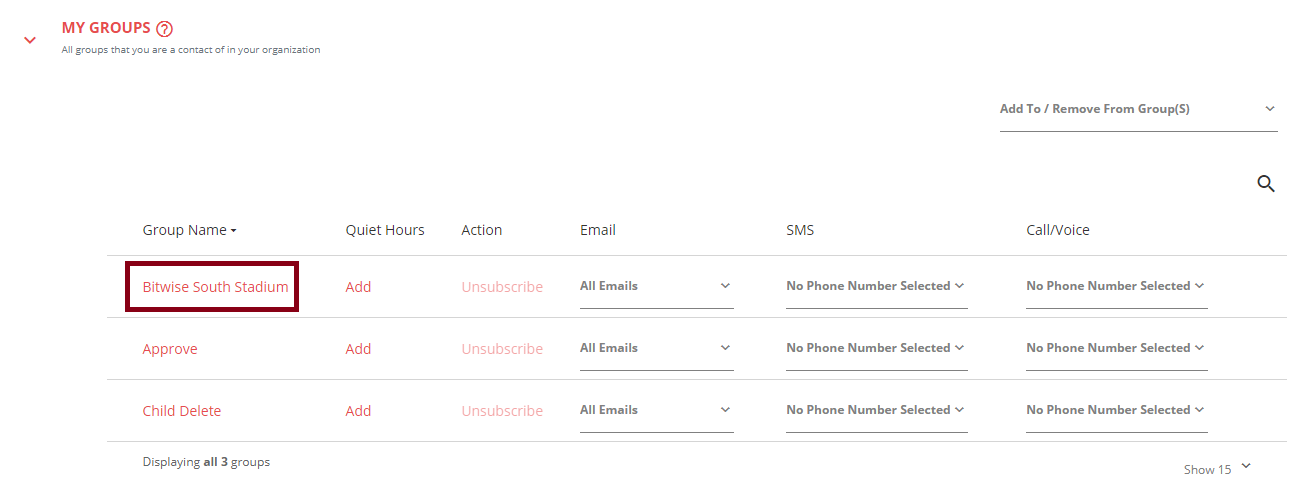
You can click on any selected group name to go to the Group Settings page. See the following image:
-
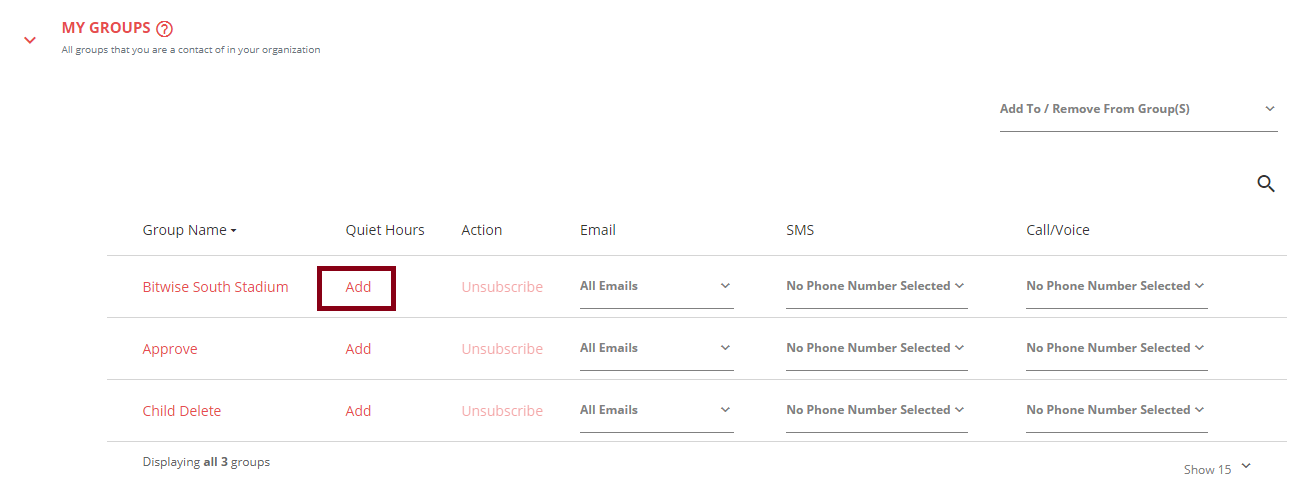
Click Add under the Quiet Hours column to add quiet hours for a group. Follow the tasks in step 11 (scroll up) of this procedure to set up quiet hours.
The following image highlights the add button:
-
You can click the dropdown corresponding to Email, SMS or Call/Voice to enable or disable communication from each group.
-
-
The My Self Subscribed Channels and All Channels Managed By Admins sections allow you to manage the channels the contact is part of.
-
Click the My Self Subscribed Channels or All Channels Managed By Admins dropdown.
-
You can click the Search icon to search for any channel.
-
Click Add under the Quiet Hours column to add quiet hours to a channel. Follow the steps in step 11 (scroll up) of this procedure to set up quiet hours.
Note: If the feature Suppress messages sent during quiet hours is enabled from the Advanced tab or the organization settings, then the contacts won't receive the messages sent during their quiet hours, even after the quiet hour window.
-
You can click Unsubscribe to unsubscribe from a channel.
Tip: When you unsubscribe, the Subscribe button appears, enabling you to re-subscribe. You can subscribe to an unsubscribed channel from anywhere you subscribed to it initially.
-
You can click the checkboxes corresponding to Email, SMS or Call/Voice to turn communication on or off from each channel. The green checkbox indicates enabled.
-
Click the Email Frequency dropdown corresponding to a channel to start receiving an email digest enlisting all emails the channel sends.
See the topic, Channel General Settings, to set up an email digest for all recipients in a channel.
-
Select a frequency from the following to receive emails:
-
As they're sent: Receive all emails when they are sent.
-
Daily Digest: Receive a single email every day at 6:00 PM in the organization’s time zone, containing all emails sent by the channel that day.
-
Weekly Digest: Receive a single email every Sunday at 6:00 PM in the organization’s time zone, containing all emails sent by the channel during that week.
-
Monthly Digest: Receive a single email on the last day of each month at 6:00 PM in the organization’s time zone, containing all emails sent by the channel during that month.
Tip: If the email digest is enabled for the channel, then the frequency set at the channel level overwrites the frequency you select here.
-
-
-
The Other Channels to Subscribe section allows you to view all the channels you can subscribe to.
-
Click the Other Channels to Subscribe drop-down.
-
You can click the Search icon to search for any channel.
-
You can see your access permissions in the Access column corresponding to each channel.
-
Click Subscribe corresponding to any channel to subscribe to it.
-
-
The All Files tab accesses Group Files shared with the contacts:
-
Click the All Files drop-down.
-
You can click the Search icon to search for any file.
-
Click the file name to open the required file.
-
-
Click Save Finish.
You receive a message confirming that the contact details are successfully saved.