---
title: Web Import of Groups Using CSV File
description: Overview You can efficiently create multiple groups by importing a CSV (Comma Separated Values) file. This method saves time when setting up or...
---
[Skip to content](https://resources.regroup.com/regroupkb/docs/web-import-of-groups-using-csv-file#main-content)
English
Show submenu for translations

Open main navigation
Close main navigation
- English
Show submenu for translations
- [Contact us](https://bit.ly/47rQCNC)
[Contact us](https://bit.ly/47rQCNC)
How can we help you?
- There are no suggestions because the search field is empty.
1. [Regroup Knowledge Base](https://resources.regroup.com/regroupkb)
2. [Manage Groups](https://resources.regroup.com/regroupkb/manage-groups)
# Web Import of Groups Using CSV File
### **Overview**
You can efficiently create multiple groups by importing a CSV (Comma Separated Values) file. This method saves time when setting up or managing large numbers of groups. Ensure your CSV follows the correct format, map the fields, and upload the file to add groups in bulk. A sample CSV file is available to guide you through the process.
---
### **Upload and Map your CSV File**
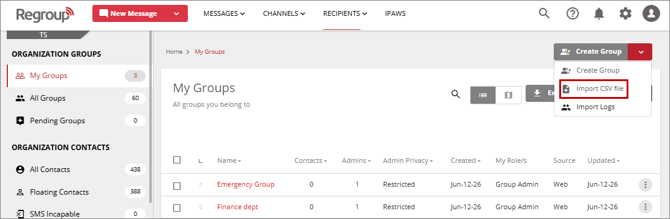
1. Navigate to the **Recipients** tab to access **All Groups** or **My Groups**
2. Click the **Create Groups** dropdown in the top right corner.
3. Choose **Import CSV File** to open the **Create Groups by Importing a CSV File** page.
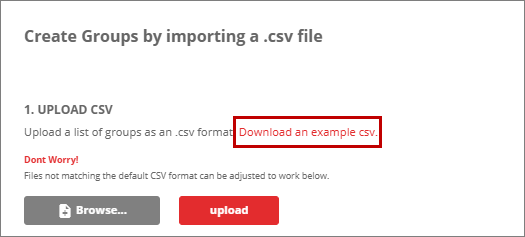
4. Download the sample CSV by clicking **Download an example CSV**.
5. Open the downloaded CSV and populate it with your group information and attributes. Refer to the topic [**CSV Syntax Guide for Group Imports**](https://docs.regroup.com/docs/possible-input-values-for-group-import-csv-fields/) for guidance.
6. Save the CSV file, then click **Browse** to locate and select it from your computer.
7. Click **Upload** to populate the data in the **Map Your Data** section.
8. Verify the number of members recognized by the system.
9. If the CSV file includes a header row, ensure the **Skip importing the first row** checkbox is enabled to prevent importing header values as a group or attribute. This option is enabled by default.
10. Map the CSV fields to the system's database fields by selecting the appropriate attribute from the **Assign Contact Attribute** dropdown for each **Imported File Header** column.
11. If a custom attribute is missing, navigate to the **Custom Attribute** tab in the **Contact Management** section to add it.
**Note:** Mapping involves matching your CSV fields to the application's database fields to ensure accurate data import.
12. Click **Add Groups** to complete the import.
#### **Additional Notes**
- You can remove an uploaded CSV by clicking **Remove**.
- [Getting started](https://resources.regroup.com/regroupkb/getting-started)
- [Incident Management](https://resources.regroup.com/regroupkb/incident-management)
- [Set Up Organization Account](https://resources.regroup.com/regroupkb/set-up-organization-account#main-content)
- [Organization Setting](https://resources.regroup.com/regroupkb/set-up-organization-account#organization-setting)
- [Configure Organization Sign-Up Pages](https://resources.regroup.com/regroupkb/set-up-organization-account#configure-organization-sign-up-pages)
- [Manage Group Automation](https://resources.regroup.com/regroupkb/set-up-organization-account#manage-group-automation)
- [Configure Message Default Settings](https://resources.regroup.com/regroupkb/set-up-organization-account#configure-message-default-settings)
- [Manage Add-Ons](https://resources.regroup.com/regroupkb/set-up-organization-account#manage-add-ons)
- [Configure Social Media Preferences](https://resources.regroup.com/regroupkb/set-up-organization-account#configure-social-media-preferences)
- [View and Download Message Reports](https://resources.regroup.com/regroupkb/set-up-organization-account#view-and-download-message-reports)
- [Configure Contacts Management](https://resources.regroup.com/regroupkb/configure-contacts-management)
- [Set Up Admins and Roles](https://resources.regroup.com/regroupkb/set-up-admins-and-roles#main-content)
- [Manage Roles](https://resources.regroup.com/regroupkb/set-up-admins-and-roles#manage-roles)
- [Managing Existing Admins](https://resources.regroup.com/regroupkb/set-up-admins-and-roles#managing-existing-admins)
- [Manage Roles](https://resources.regroup.com/regroupkb/manage-roles)
- [Manage Groups](https://resources.regroup.com/regroupkb/manage-groups#main-content)
- [Create Groups Using Import](https://resources.regroup.com/regroupkb/manage-groups#create-groups-using-import)
- [Add Groups Using FTP Import](https://resources.regroup.com/regroupkb/manage-groups#add-groups-using-ftp-import)
- [Create or Update Group Hierarchy](https://resources.regroup.com/regroupkb/manage-groups#create-or-update-group-hierarchy)
- [Manage Group Files](https://resources.regroup.com/regroupkb/manage-groups#manage-group-files)
- [Manage Group Admin Profile](https://resources.regroup.com/regroupkb/manage-groups#manage-group-admin-profile)
- [Export Groups](https://resources.regroup.com/regroupkb/manage-groups#export-groups)
- [Configure Recipients and Admins](https://resources.regroup.com/regroupkb/configure-recipients-and-admins#main-content)
- [Add Recipients to Groups](https://resources.regroup.com/regroupkb/configure-recipients-and-admins#add-recipients-to-groups)
- [Manage Group Contacts](https://resources.regroup.com/regroupkb/configure-recipients-and-admins#manage-group-contacts)
- [Manage Organization Contacts](https://resources.regroup.com/regroupkb/configure-recipients-and-admins#manage-organization-contacts)
- [Manage Floating Contacts](https://resources.regroup.com/regroupkb/configure-recipients-and-admins#manage-floating-contacts)
- [Manage Communication Channels](https://resources.regroup.com/regroupkb/manage-communication-channels#main-content)
- [Create Channels](https://resources.regroup.com/regroupkb/manage-communication-channels#create-channels)
- [Create Channels Using Import](https://resources.regroup.com/regroupkb/manage-communication-channels#create-channels-using-import)
- [Setup Channels](https://resources.regroup.com/regroupkb/manage-communication-channels#setup-channels)
- [Create and Manage Sender Profiles](https://resources.regroup.com/regroupkb/manage-communication-channels#create-and-manage-sender-profiles)
- [Setup Social Media](https://resources.regroup.com/regroupkb/manage-communication-channels#setup-social-media)
- [Add Recipients to Channel](https://resources.regroup.com/regroupkb/manage-communication-channels#add-recipients-to-channel)
- [Manage Existing Channel Admins](https://resources.regroup.com/regroupkb/manage-communication-channels#manage-existing-channel-admins)
- [Setup Channel Subscriptions](https://resources.regroup.com/regroupkb/manage-communication-channels#setup-channel-subscriptions)
- [Manage Subscribers](https://resources.regroup.com/regroupkb/manage-communication-channels#manage-subscribers)
- [Manage Messages](https://resources.regroup.com/regroupkb/manage-messages#main-content)
- [WhatsApp Messaging](https://resources.regroup.com/regroupkb/manage-messages#whatsapp-messaging)
- [Set Up Message Defaults While Messaging](https://resources.regroup.com/regroupkb/manage-messages#set-up-message-defaults-while-messaging)
- [Message Templates](https://resources.regroup.com/regroupkb/manage-messages#message-templates)
[](http://www.regroup.com)
[mailto:email@email.com](mailto:email@email.com)
Copyright © 2026, Regroup Mass Notification