
You can create a trigger for either a specific asset or for assets that share the same label.
-
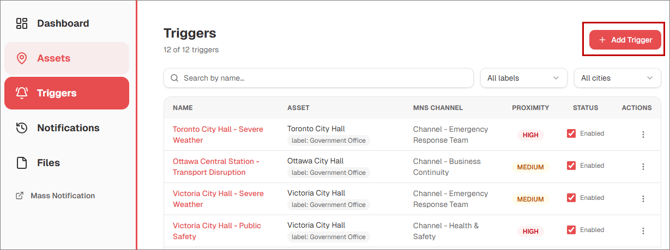
From the left navigation pane, select Triggers, and then click + Add Trigger.
or
From the Assets page, click the Actions (three-dot) icon for the required asset, and then select Add new notification from the popup menu.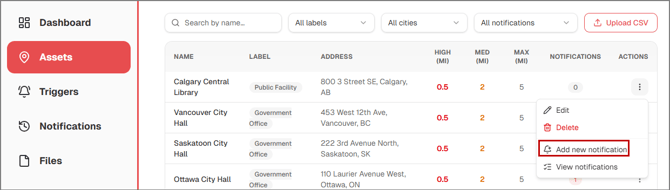
The Add Notification Config dialog is displayed.
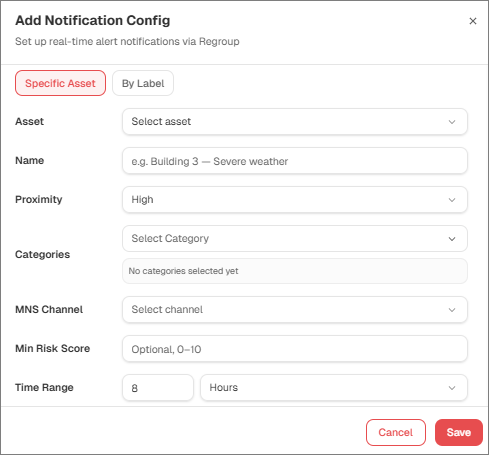
- On the Add Notification Config dialog, select one of the following options:
- Specific Asset: Select this option when you want the trigger to monitor a single asset. After selecting this option, configure the following fields.
-
Asset: Select the asset for which you want to create the trigger.
-
Name: Enter a descriptive name for the trigger.
-
Proximity: Select the proximity level that determines how close an alert must be to the asset for the trigger to apply.
Available levels can include:
-
High
-
Medium
-
Low
-
-
Categories: Select Categories and subcategories to specify the types of threats that the trigger should monitor.
-
MNS Channel: Select the Regroup Mass Notification channel through which matching alerts will be sent.
-
Min Risk Score: Optionally specify the minimum risk score an alert must have to meet the trigger criteria. The supported range is 0–10.
-
Time Range: Specify how recent an alert must be for the trigger to send it. Alerts older than the configured time range are not sent.
For example, if the Time Range is set to 8 Hours, alerts older than eight hours are not sent through the configured MNS channel.
The maximum supported time range is 10 days.
-
- Specific Asset: Select this option when you want the trigger to monitor a single asset. After selecting this option, configure the following fields.
-
-
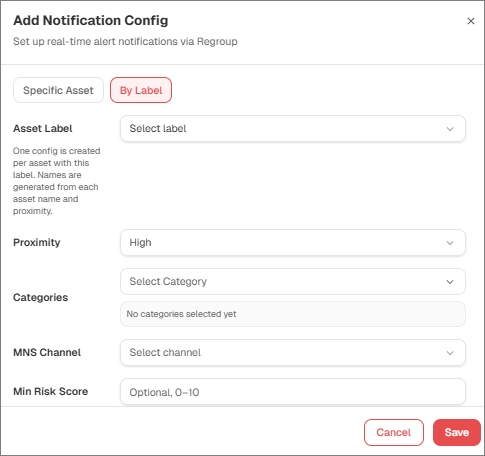
By Label: Select this option to create trigger configurations for assets associated with the selected label. After selecting this option, configure the following fields.
-
Asset Label: Select an asset label from the dropdown.
-
Proximity: Select the proximity level that determines how close an alert must be to the asset for the trigger to apply.
Available levels can include:
-
High
-
Medium
-
Low
-
-
Categories: Select Categories and subcategories to specify the types of threats that the trigger should monitor.
-
MNS Channel: Select the Regroup Mass Notification channel through which matching alerts will be sent.
-
Min Risk Score: Optionally specify the minimum risk score an alert must have to meet the trigger criteria. The supported range is 0–10.
-
Time Range: Specify how recent an alert must be to meet the trigger criteria and be sent through the configured MNS channel. Alerts older than the configured time range are not sent.
For example, if the Time Range is set to 8 Hours, alerts older than eight hours are not sent through the configured MNS channel.
The maximum supported time range is 10 days.
-
-
-
Click Save.
View a Trigger
You can view the complete configuration of an existing trigger.
-
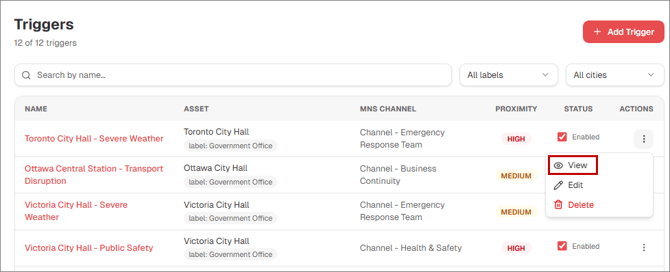
On the Triggers page, locate the trigger you want to review.
-
Click the Actions (three-dot) icon.
-
From the popup menu, select View.
The trigger details dialog is displayed.
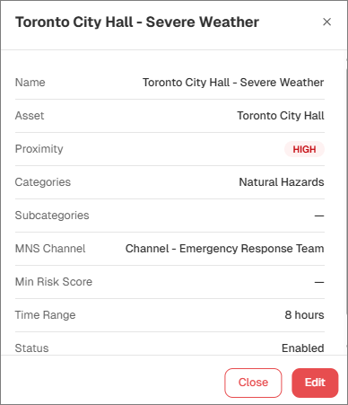
Depending on the trigger configuration, you can review:
-
Name
-
Asset
-
Proximity
-
Categories
-
Subcategories
-
MNS Channel
-
Min Risk Score
-
Time Range
-
Status
Enable or Disable a Trigger
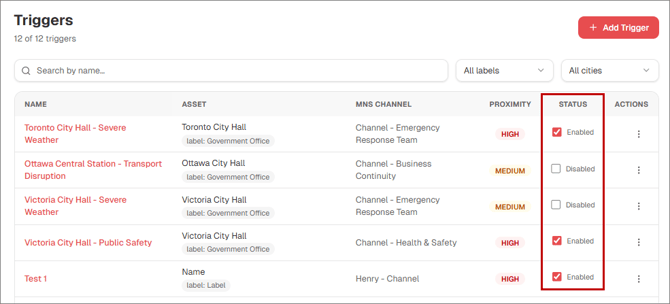
On the Triggers page, you can enable or disable a trigger from the Status column. When the Status checkbox is selected, the trigger is active and can send matching alerts through the configured MNS Channel. When the checkbox is deselected, the trigger is disabled and does not send notifications until it is enabled again.
Modify a Trigger
You can modify the configurations of an existing trigger.
-
On the Triggers page, locate the trigger you want to modify.
-
Click the Actions (three-dot) icon.
-
From the popup menu, click Edit.
The Edit Notification dialog is displayed.
-
Modify the available settings as needed, such as:
-
Name
-
Proximity
-
Categories
-
MNS Channel
-
Min Risk Score
-
Time Range
For details on these parameters, see the Step 3 in Add an Asset section.
-
- Click Save Changes.